A Brief History of NuTone Intercom Systems
 Thursday, August 9, 2012 at 10:42AM
 Part 1
In order to understand NuTone intercom system designs you need to understand how the systems fit onto a time line. NuTone system designs were evolutionary, meaning that new models were based on the previous models, but with new features and better technology.
NuTone would design a “platform”, which was the fundamental building block that every model would use. By adding features to the platform, new and different models would be created.
NuTone intercom systems can be divided into different groups based on the type of wire each platform uses. There are two main wire types: 3-wire systems and 6-wire systems. These two wire types comprise about 80% of all NuTone intercom systems.
There are a few exceptions with regard to wire types. NuTone has also made 5-wire, 8-wire and 4-wire systems.
Another design consideration with NuTone intercoms systems is how the wiring is laid out and installed. There are two types of wiring schemes that are used with NuTone intercom systems. They are Home-Run systems and Loop-Wired systems.
Home-Run Systems: In a home-run wiring layout each remote station (entry door, inside and patio) has its own individual cable with the appropriate numbers of wires in the cable (3,4, 5, 6 or 8 wires) and these cables all run directly back to the master station. As an example, if there are 9 remote stations, there will be 9 cables behind the master station. Home-run systems comprise 80% of all NuTone systems.
Loop-Wire Systems: In a looped-wired system, there will be multiple stations on a single cable of wires. As an example, if there are 9 remote stations, these may be grouped onto 3 cables. Cable #1 may have 3 stations, cable #2 may have 4 stations and Cable #3 may have just 2 stations. Behind the master station you will only find the 3 cables. NuTone loop-wired systems use either 6 or 8 wire cable.
One thing to keep in mind is the following rule: NuTone intercom models that were designed to be Looped-Wired systems can be looped-wired or home-run, either layout or a combination of both will work. NuTone intercom models that were designed to be Home-Run systems can only be installed with Home-run wiring, no exceptions.
All of the original NuTone intercom systems were vacuum tube designs, and all vacuum tube models are 3-wire systems with one exception (model 2400, which is a 5-wire, home-run Stereo Music Intercom System).
The first model to use solid-state electronics (transistors and diodes) also used a different wire type. It was the model N2561-2562. This revolutionary model was a huge design step forward for NuTone and was an 8-wire, loop-wired system. The N2561-2562 was in production from 1957 through 1974, that's 17 years!
A quick note about early NuTone model numbers: In the early days, NuTone used model numbers like 2011-2012. The 2011 and 2012 are basically the model except the finish (color) of the model was different. For example, the 2011 had a silver faceplate and the 2012 had a copper-tone faceplate. This is the way NuTone labeled their Intercom models until the mid 1970's. After 1974, NuTone added letters to the model number to denote the finish of the intercom. For example a IMA303T (traditional) was a dark walnut finish, and an IMA303L (light) had a light maple finish.
The last year of production for vacuum tube models was 1966. Since then all models have solid-state electronics.
Vacuum Tube 3-Wire Models:
1954 – 1966: 2011/2012 2013/2014 2015/2016 2053/2054 2055/2056 2057/2058
Vacuum Tube 5-Wire Model:
1957 - 1962: 2400 Stereo Music Intercom
Solid-State 3-Wire Models:
1966 – 1971: 2067/2068
1968 – 1975: 2090/2091 2063/2064
1975 – 1983: IM203/IMA203 IM303/IMA303 IM323/IMA323 IM313/IMA313 + B,C,D
1984 – 1994: IM2003 IM3003/IMA3303 IM3103/IMA3103
1994 – 2006: IM3303/IMA3303
Solid-State 5-Wire Model:
1966 – 1972: 2071 Stereo Music Intercom
Solid-State 8-Wire Model:
1957 – 1974: N2561/N2562 2500
1975 – 1983: I600 SM428
Solid-State 6-Wire Models:
1965 – 1975: 470
1968 – 1975: 2540/2541 2542 462
1975 – 1985: IM406/IMA406 IM806/IMA806
1986 – 1995: IM4006/IMA4006 IM5006
1996 – 2006: IM4404/IMA4406 IM5000
Solid-State 4-Wire Models:
1997 – 2004: IM3204/IMA3204 SR9000 Stereo Music System
Finally we have to include the rarest NuTone Intercom model ever made, the IM6106. Originally the IM6106 was scheduled to be released in 1988 but due to design and manufacturing problems, the release was delayed many times. There were about 400 pre-production units released to dealers and installed in homes. For the next 3 years, everyone struggled to keep these units working until finally the model was dropped and all of the 400 units were replaced at NuTone's expense. If you have an IM6106 you have a rare and unrepairable unit.
 Cindy & Christopher
Platforms are the starting point:
The very first NuTone intercom systems (the vacuum tube models) were all designed around the same platform and all of these models used the same inside remote, entry door and patio stations. The original idea was that a homeowner would buy a basic model like a 2011 (which only had AM radio) and they could update just the master station to a better model (AM and FM) a few years later.
Of course, this never really happened and the homeowner had to live with just AM radio.
The concept of platforms is still used today. The advantage of using platforms is that it keeps design time and manufacturing costs lower. The disadvantage is that when a new platform is designed it will not be backwards compatible with older models. This means that when a system is updated to a new platform, all of the equipment must be replaced also.
Updating platform designs is necessary. Without new platforms there would never be any new features and we would all still be listening to AM radio.
The additional advantage to platforms occurs when servicing and repairing NuTone intercoms systems. Common problems will occur across the platform to all models.
There are a few unique models that do not share their platform with any other model. These models inlcude the IM806/IMA806 and the 2500 Stereo Music Intercom, I600 Selective Call Intercom. These “specialty” models are typically more expensive and more difficult to repair.
Finally a note about NuTone model numbering. Starting in the mid 1970's, NuTone began to use model numbers which started with the letters “IM” which mean “Intercom Master”. When NuTone would release a mid-production update to an existing model, they would add a letter to the “IM”. So the IM313 would become the IMA313, of course some models had many updates and the IMA313 became the IMB313, then the “IMC” and finally the “IMD”.
While there are many similarities between original versions and updated versions of any given model they are never exactly the same. You MUST determine the exact version and use the correct manual to have any chance of repairing your intercom.
 Cindy & Christopher
Now that you have some back ground about NuTone intercom systems, lets get back to the 10 most common things that go wrong.
In general, many problems with NuTone intercom systems can be solved with some basic adjustments and general service. Common things we hear from homeowners about their intercom systems are:
-
“We had one of those NuTone intercom systems in our house and it seems to work well for a while then it didn't work right any more”.
-
“I used to be able to hear my door bell through the intercom system and now I can't”.
These types of comments, taken on their face value, would seem to indicate a broken or damaged system when, in reality, they are caused by having a system that is way out of adjustment.
While every model of NuTone intercom system has it own individual setup parameters, there are some basic adjustments that will help your system operate at its best.
How to adjust your intercom system:
On every NuTone Master Station there are 2 primary adjustments:
-
Intercom Volume: This adjustment varies the volume of the voice (intercom) part of the system.
-
System Volume: This adjustment varies the music volume throughout the entire system at one time.
While these adjustments are called “volume” controls which is easy for consumers to relate to, they are not truly volume controls. These are actually “gain” adjustments.
Here's how gain adjustments work: Intercom systems use amplifiers to boost up every signal (music, radio, voice) that is sent to them. When you speak into an intercom station, your voice becomes the signal and the amplifier boosts it up and sends it out to the other stations where the recipient can hear it.
The gain adjustment changes how much of the signal from your voice is sent into the amplifier. At a maximum setting (100%) the amplifier receives all of your voice and the sound from the remote stations will be very, very loud. If you lower the “gain” adjustment to 25%, the amplifier receives less signal and the final volume will be much lower.
You can look at gain adjustments as a “power control”; the more signal there is, the louder the volume, and the lower the signal, the lower the volume.
How is this important to your intercom system? If you have the gain controls set too high, the amplifier will produce too much volume throughout your house. In response to the very loud volume, you will do what seems natural and turn down the volume knob on each remote station. This is exactly the wrong thing to do. Each remote station has its own individual volume control, which is referred to as a “local volume control”. Local volume controls change the volume at their own location and do not effect any other part of the system.
By turning down a local volume control, you will lower the volume at that station, but you are not lowering the power output of the amplifier. If the gain adjustment is set too high (90%), and the local volume controls are turned down (10%), there is excess power leftover from the amplifier in the system.
Contrary to what many people may think, the excess power does not evaporate into thin-air. It has to go somewhere and it becomes heat in the amplifier. Any time you have the words “heat” and “amplifier” in the same sentence something is destined to go wrong.
Here's the correct way to adjust your intercom system to have it work as well as it possibly can:
-
Turn each volume control on every remote station to maximum.
-
Turn the “Intercom Volume” and “System Volume” on your master station to minimum (fully counter clockwise).
-
Turn on the radio and tune it to a strong FM station
-
Turn up the “System Volume” (clockwise) until the radio plays at a comfortable level.
-
Turn up the “Intercom Volume” adjustment half-way.
-
Place someone at the furthest remote station, and call to them by using the intercom system.
-
Make small adjustments to the “Intercom Volume” until the conversation through the system is clear and has enough volume without being loud.
Your system is now basically in adjustment. You will find that the music volume throughout your house is comfortable and the intercom calls are clear and easy to understand.
You will also find that if the music volume is slightly loud in some rooms, you can make small volume adjustments in those rooms by turning down that local volume control. A small change, say from 5 o'clock to 3 o'clock on the volume knob will make a substantial change in volume in that room without adversely affecting the intercom clarity.
These adjustments will also allow you to hear your intercom system's built-in door chime loudly and clearly, if your system has that option.
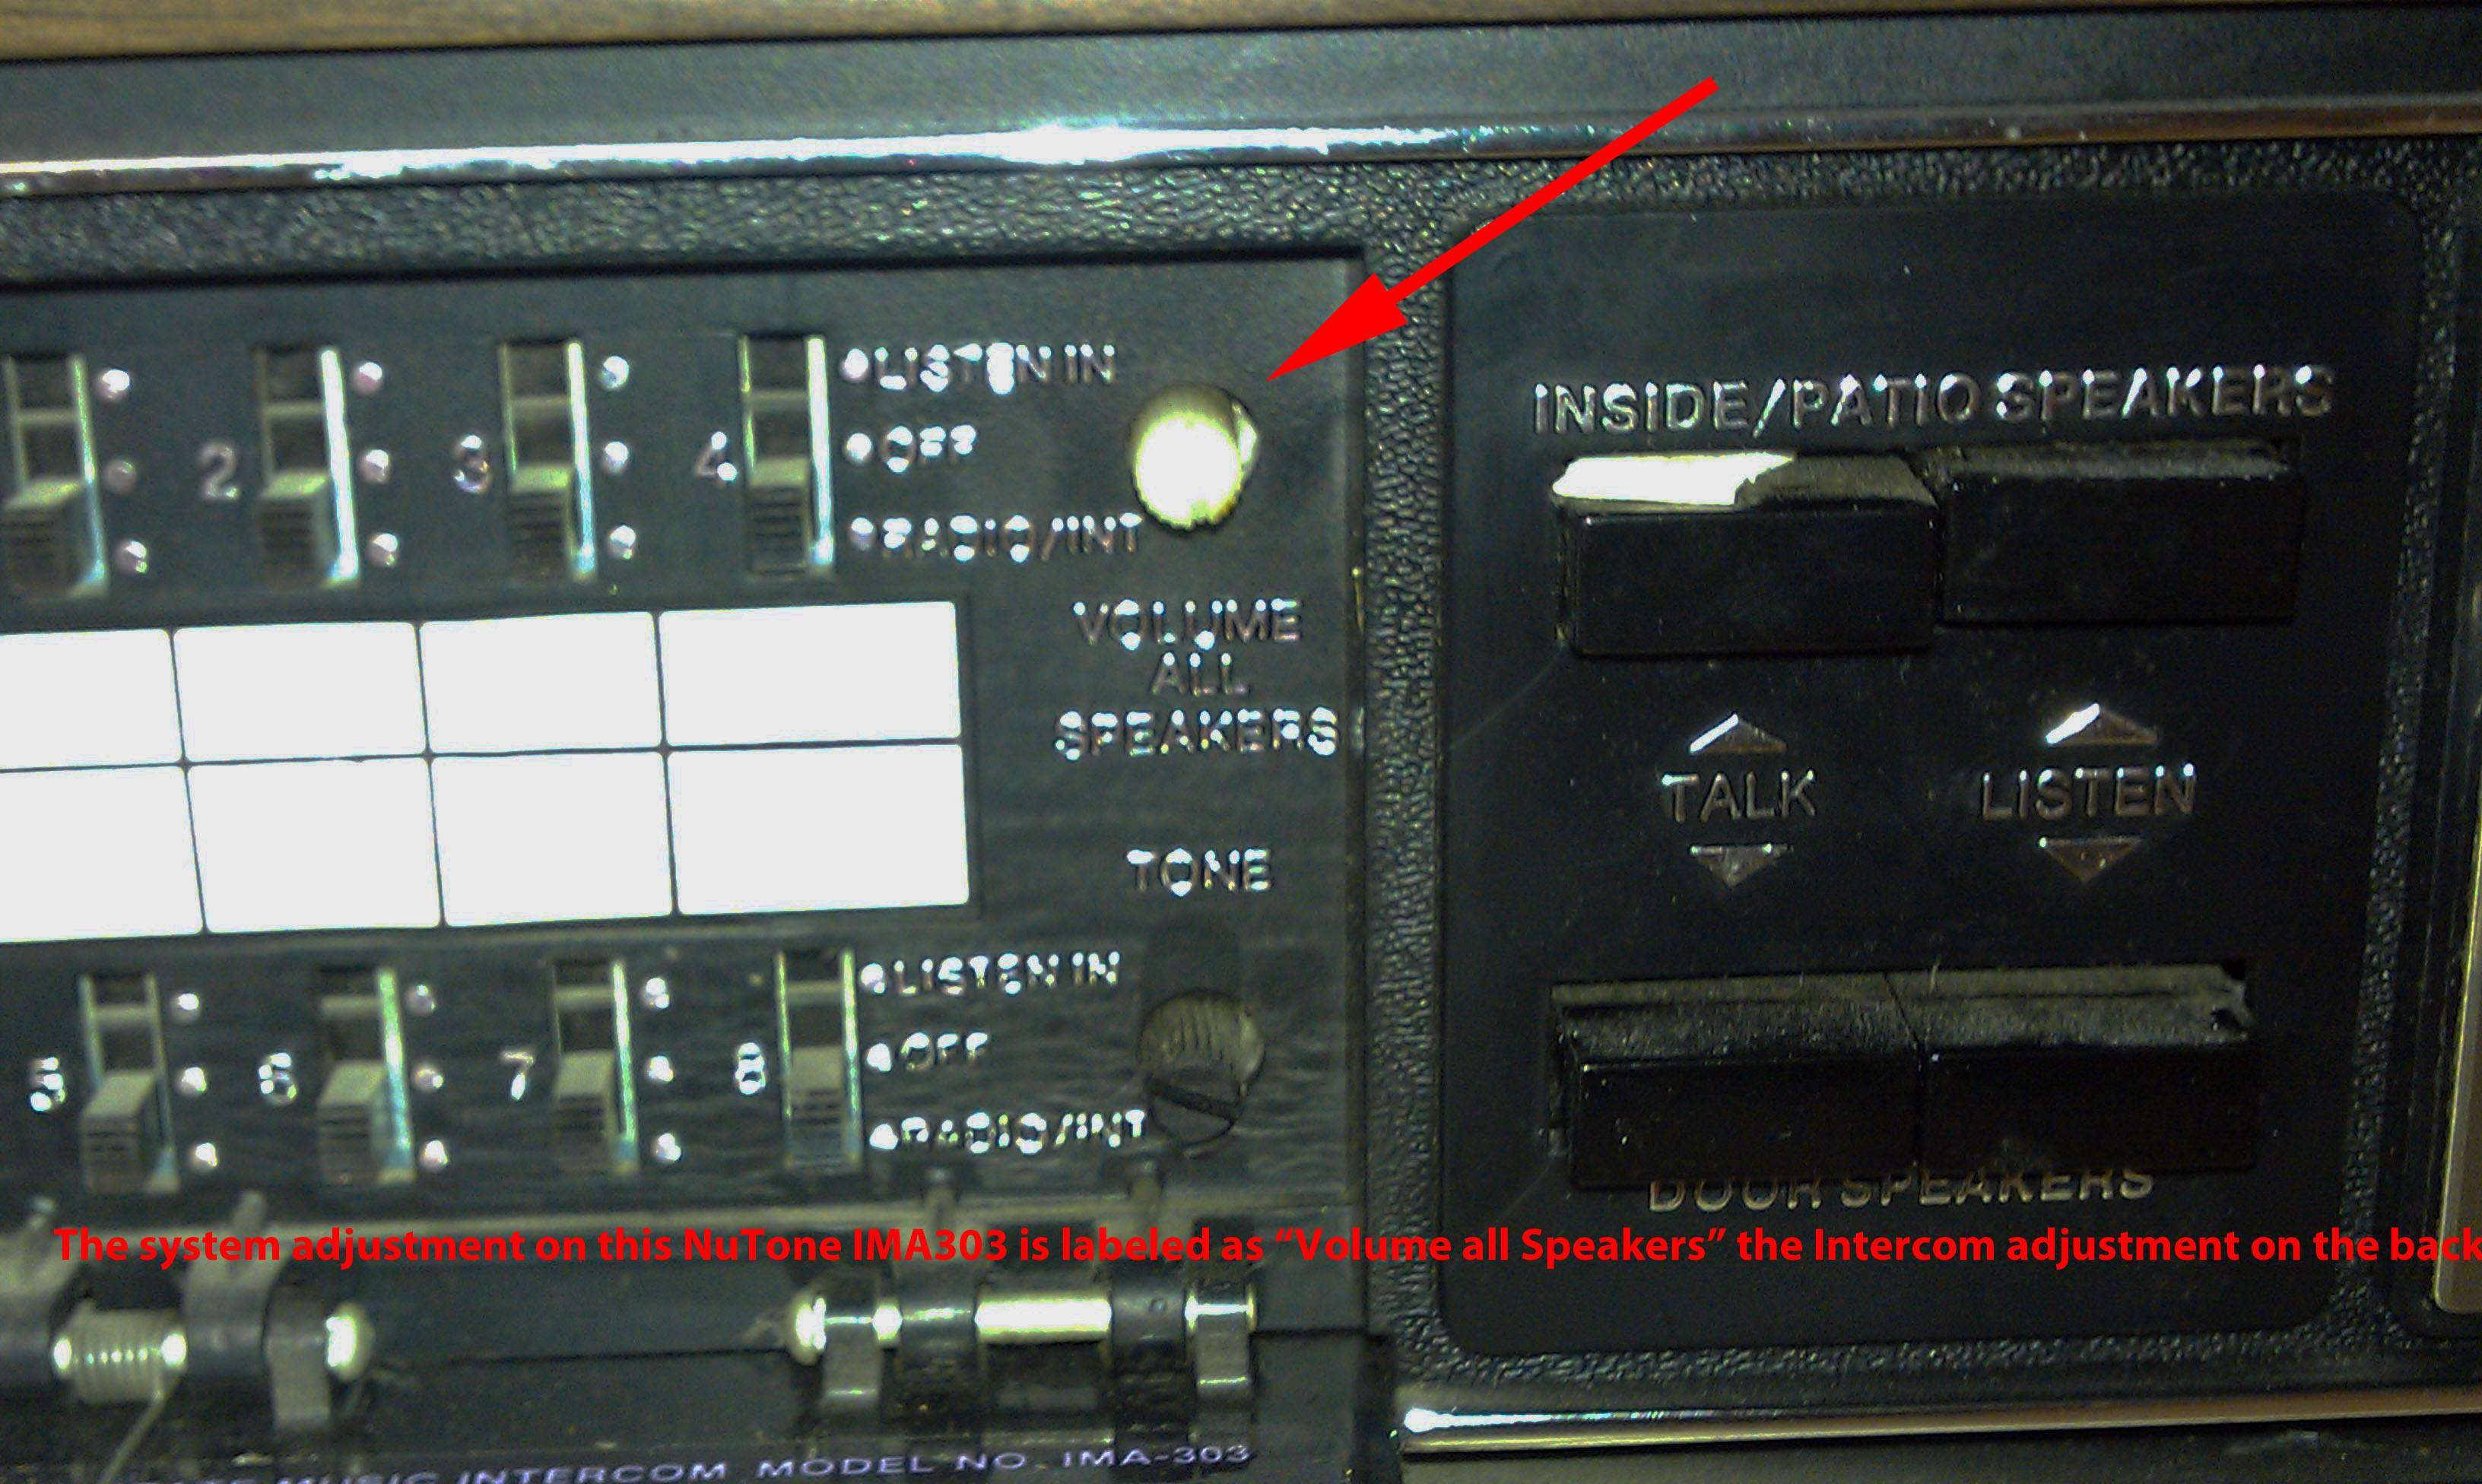
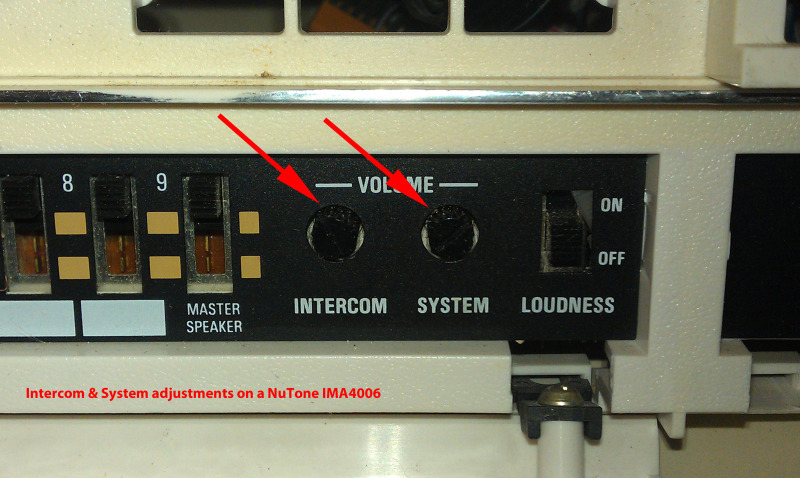
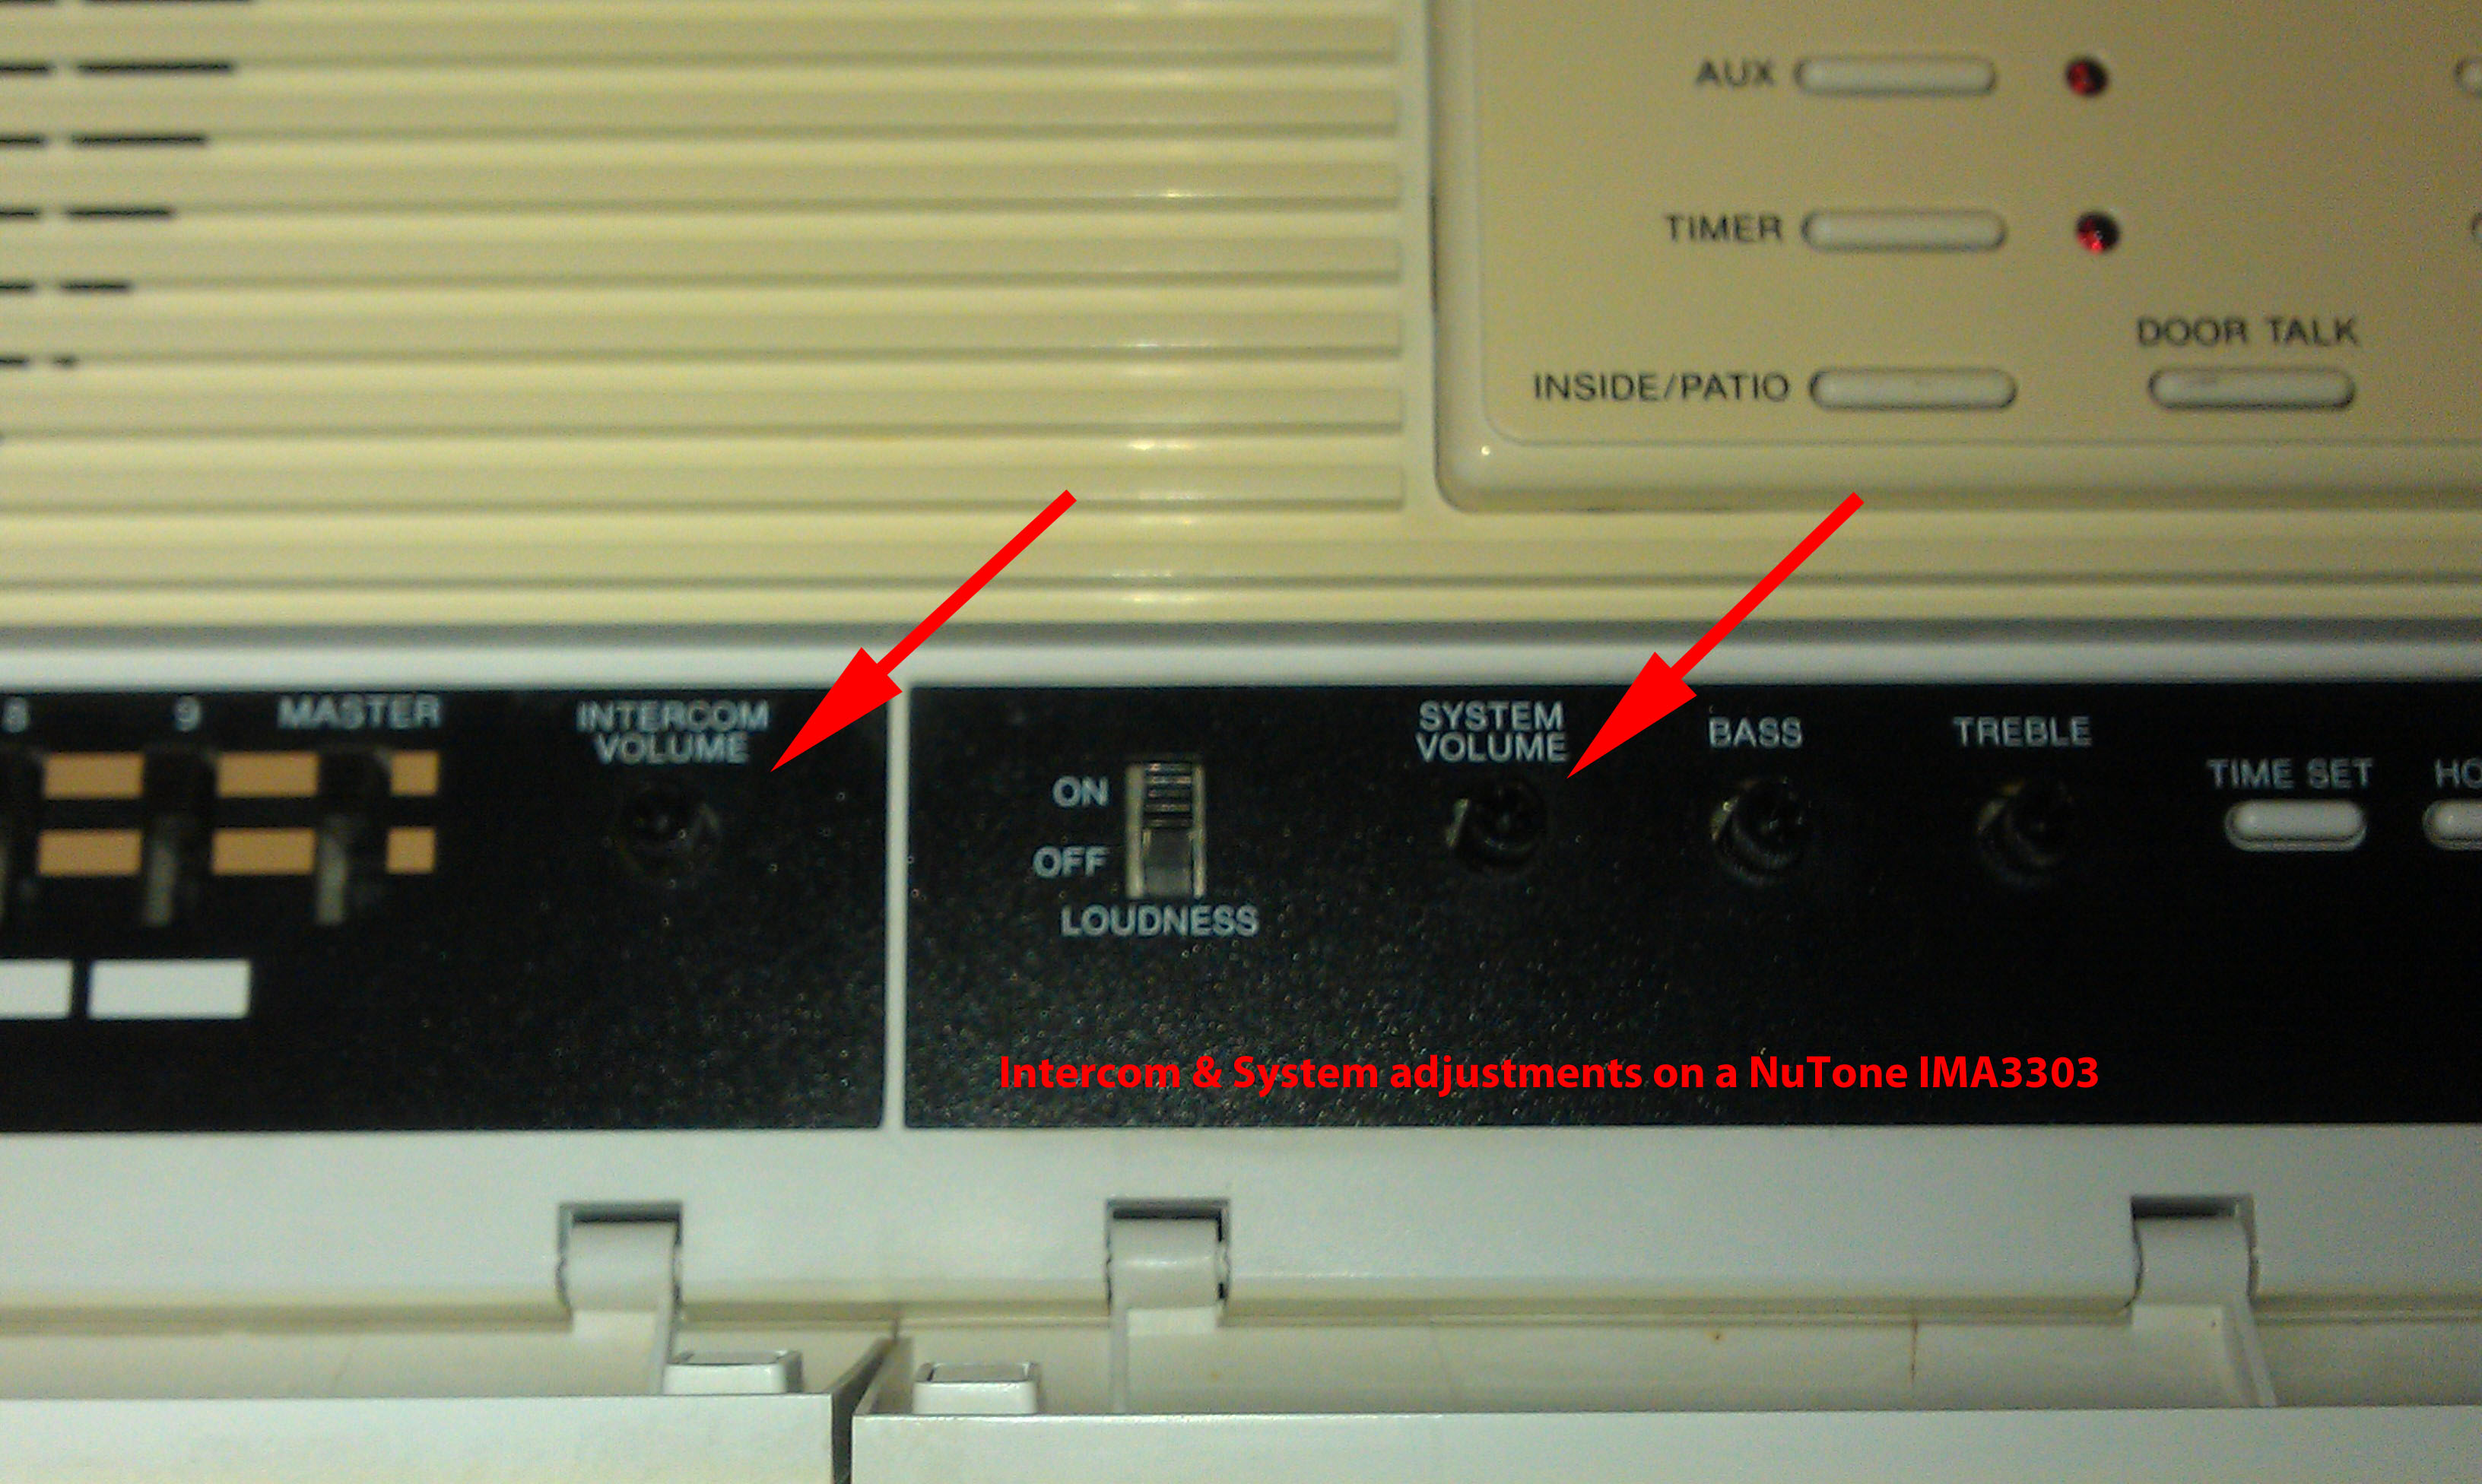
 Cindy & Christopher
Now that you have your system properly adjusted, let's look at another common problem that will make it seem that your system is broken.
Dirty volume controls on the remote stations will give the impression that you have stations that do not work correctly or at all.
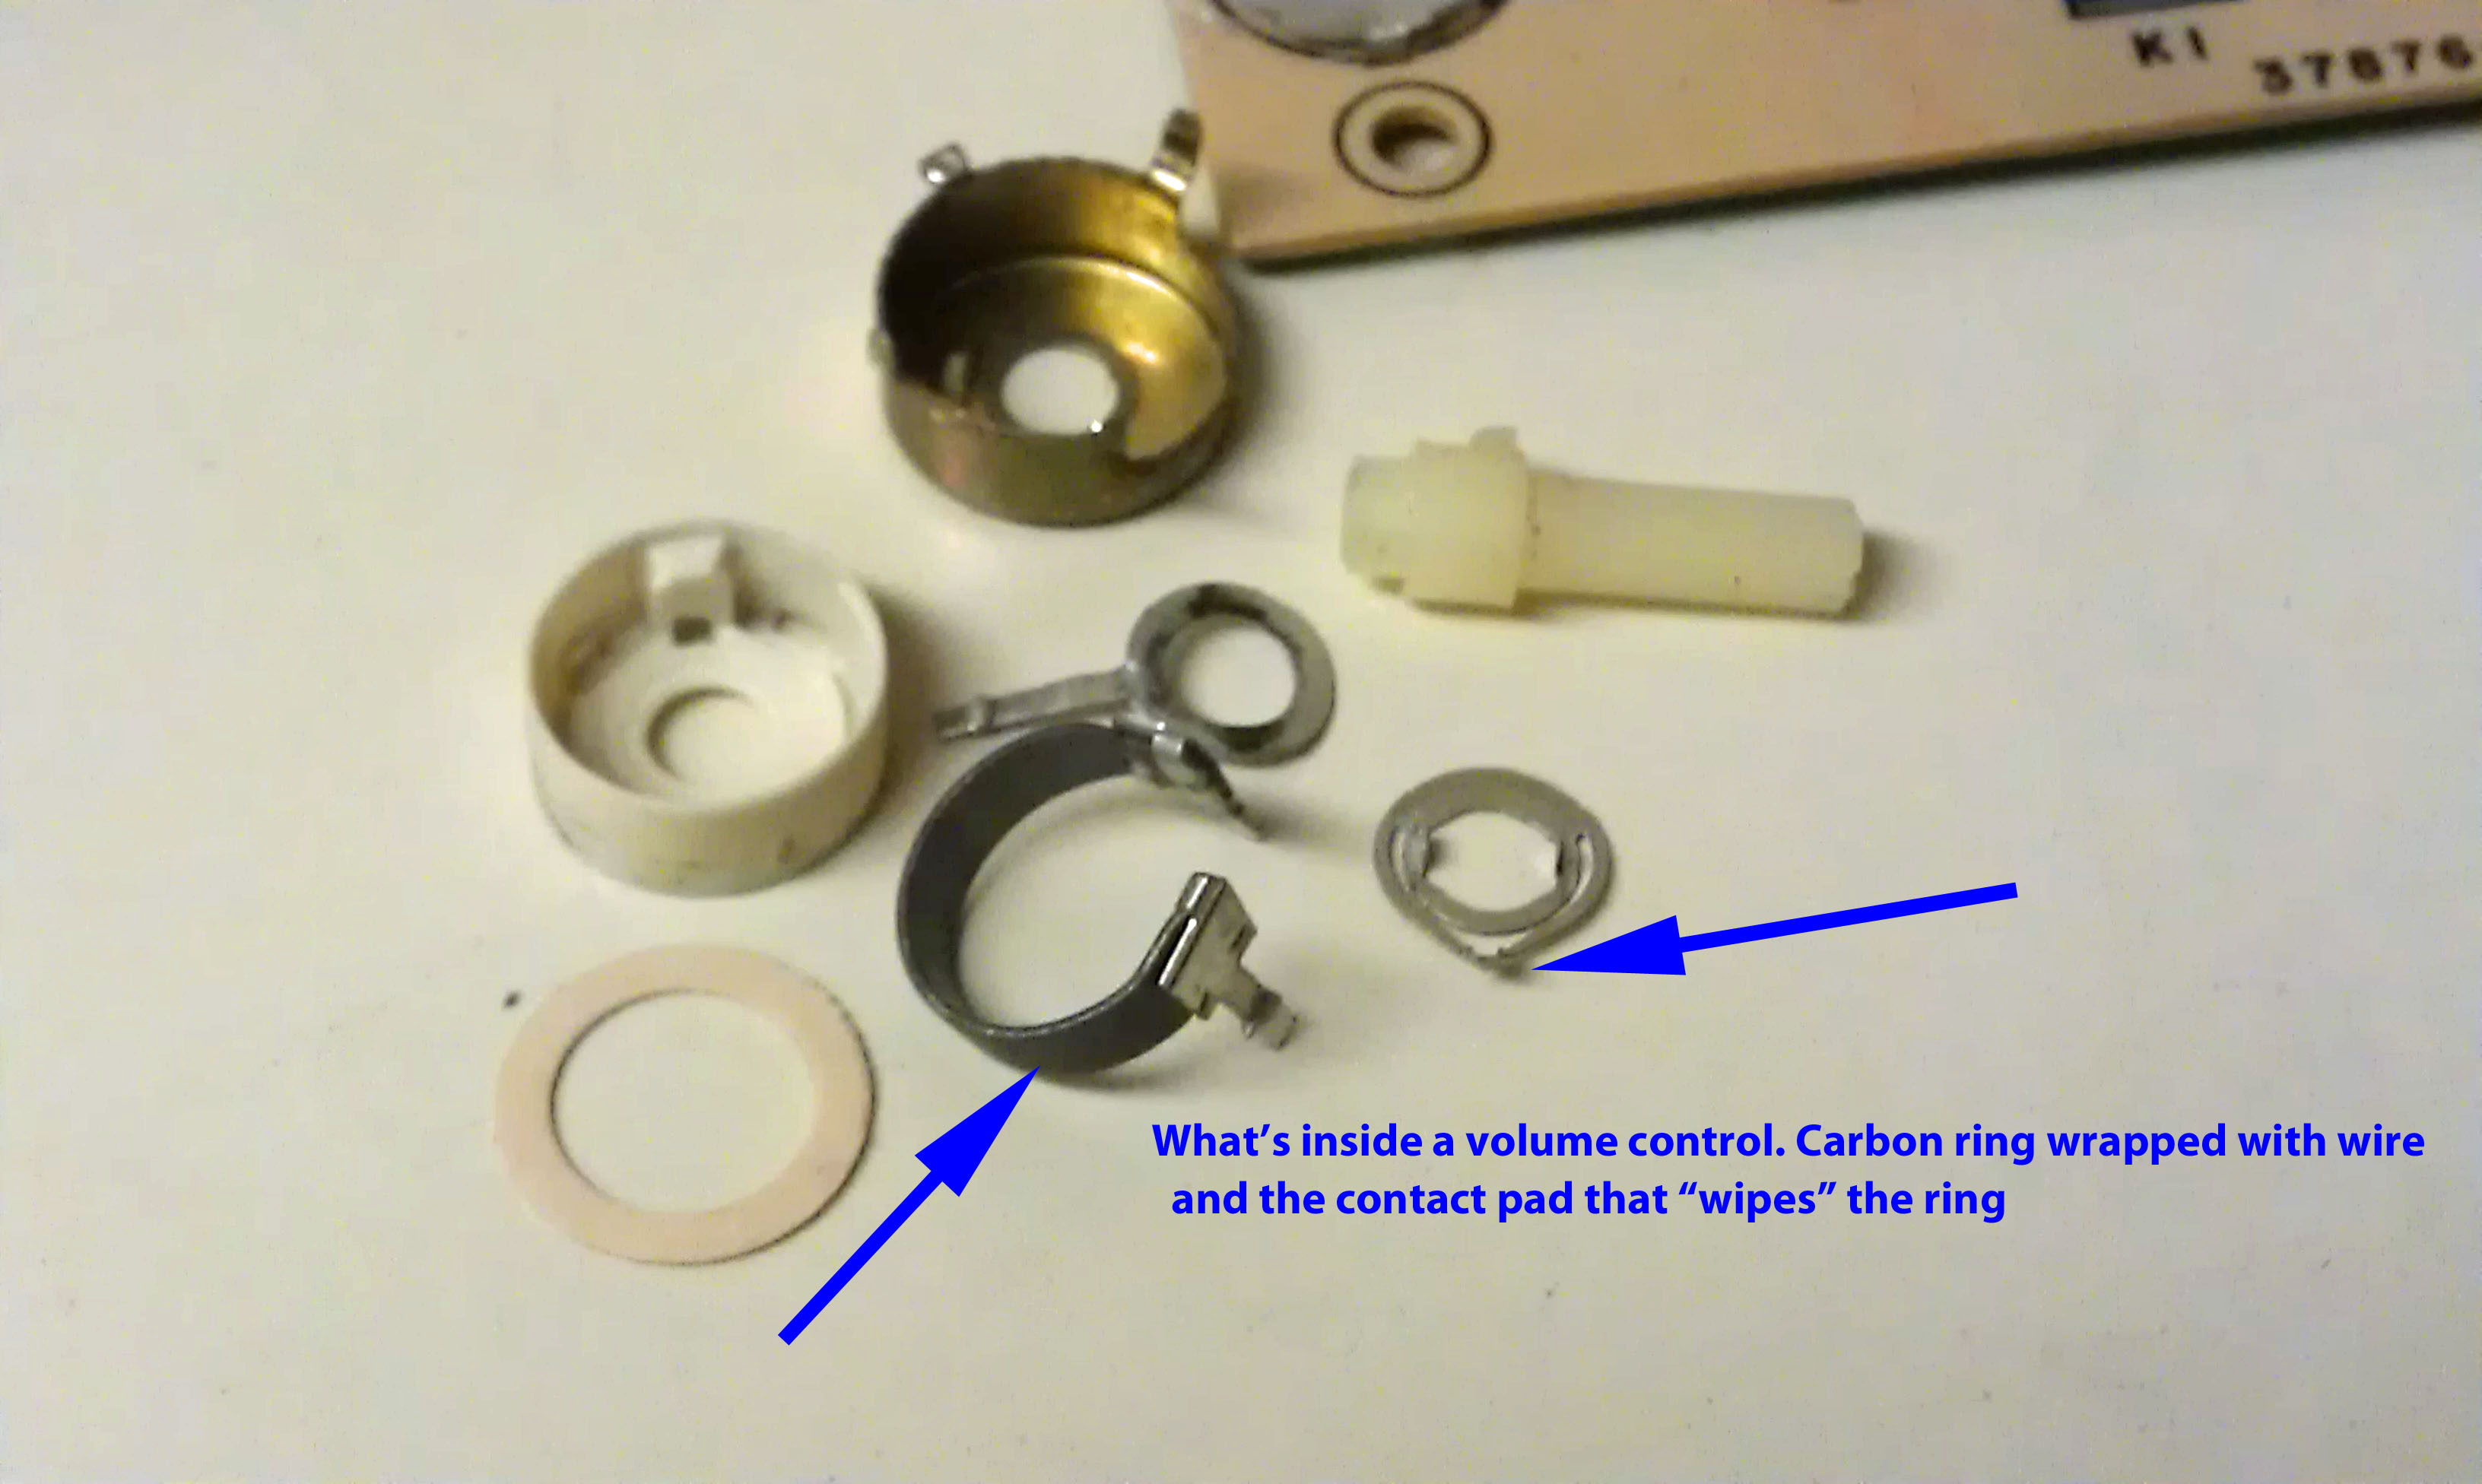
It's important to understand why the volume controls get dirty and how this effects the operation of your system. The volume knob is connected to the volume potentiometer, which is constructed with a ring of carbon (like a donut make from pencil lead) which has a very small wire (the size of a single strand of hair) wrapped around and around the carbon ring. Touching the wire-wrapped carbon ring is a small metal pad which touches the wire and it moves around the ring as you turn the volume knob.
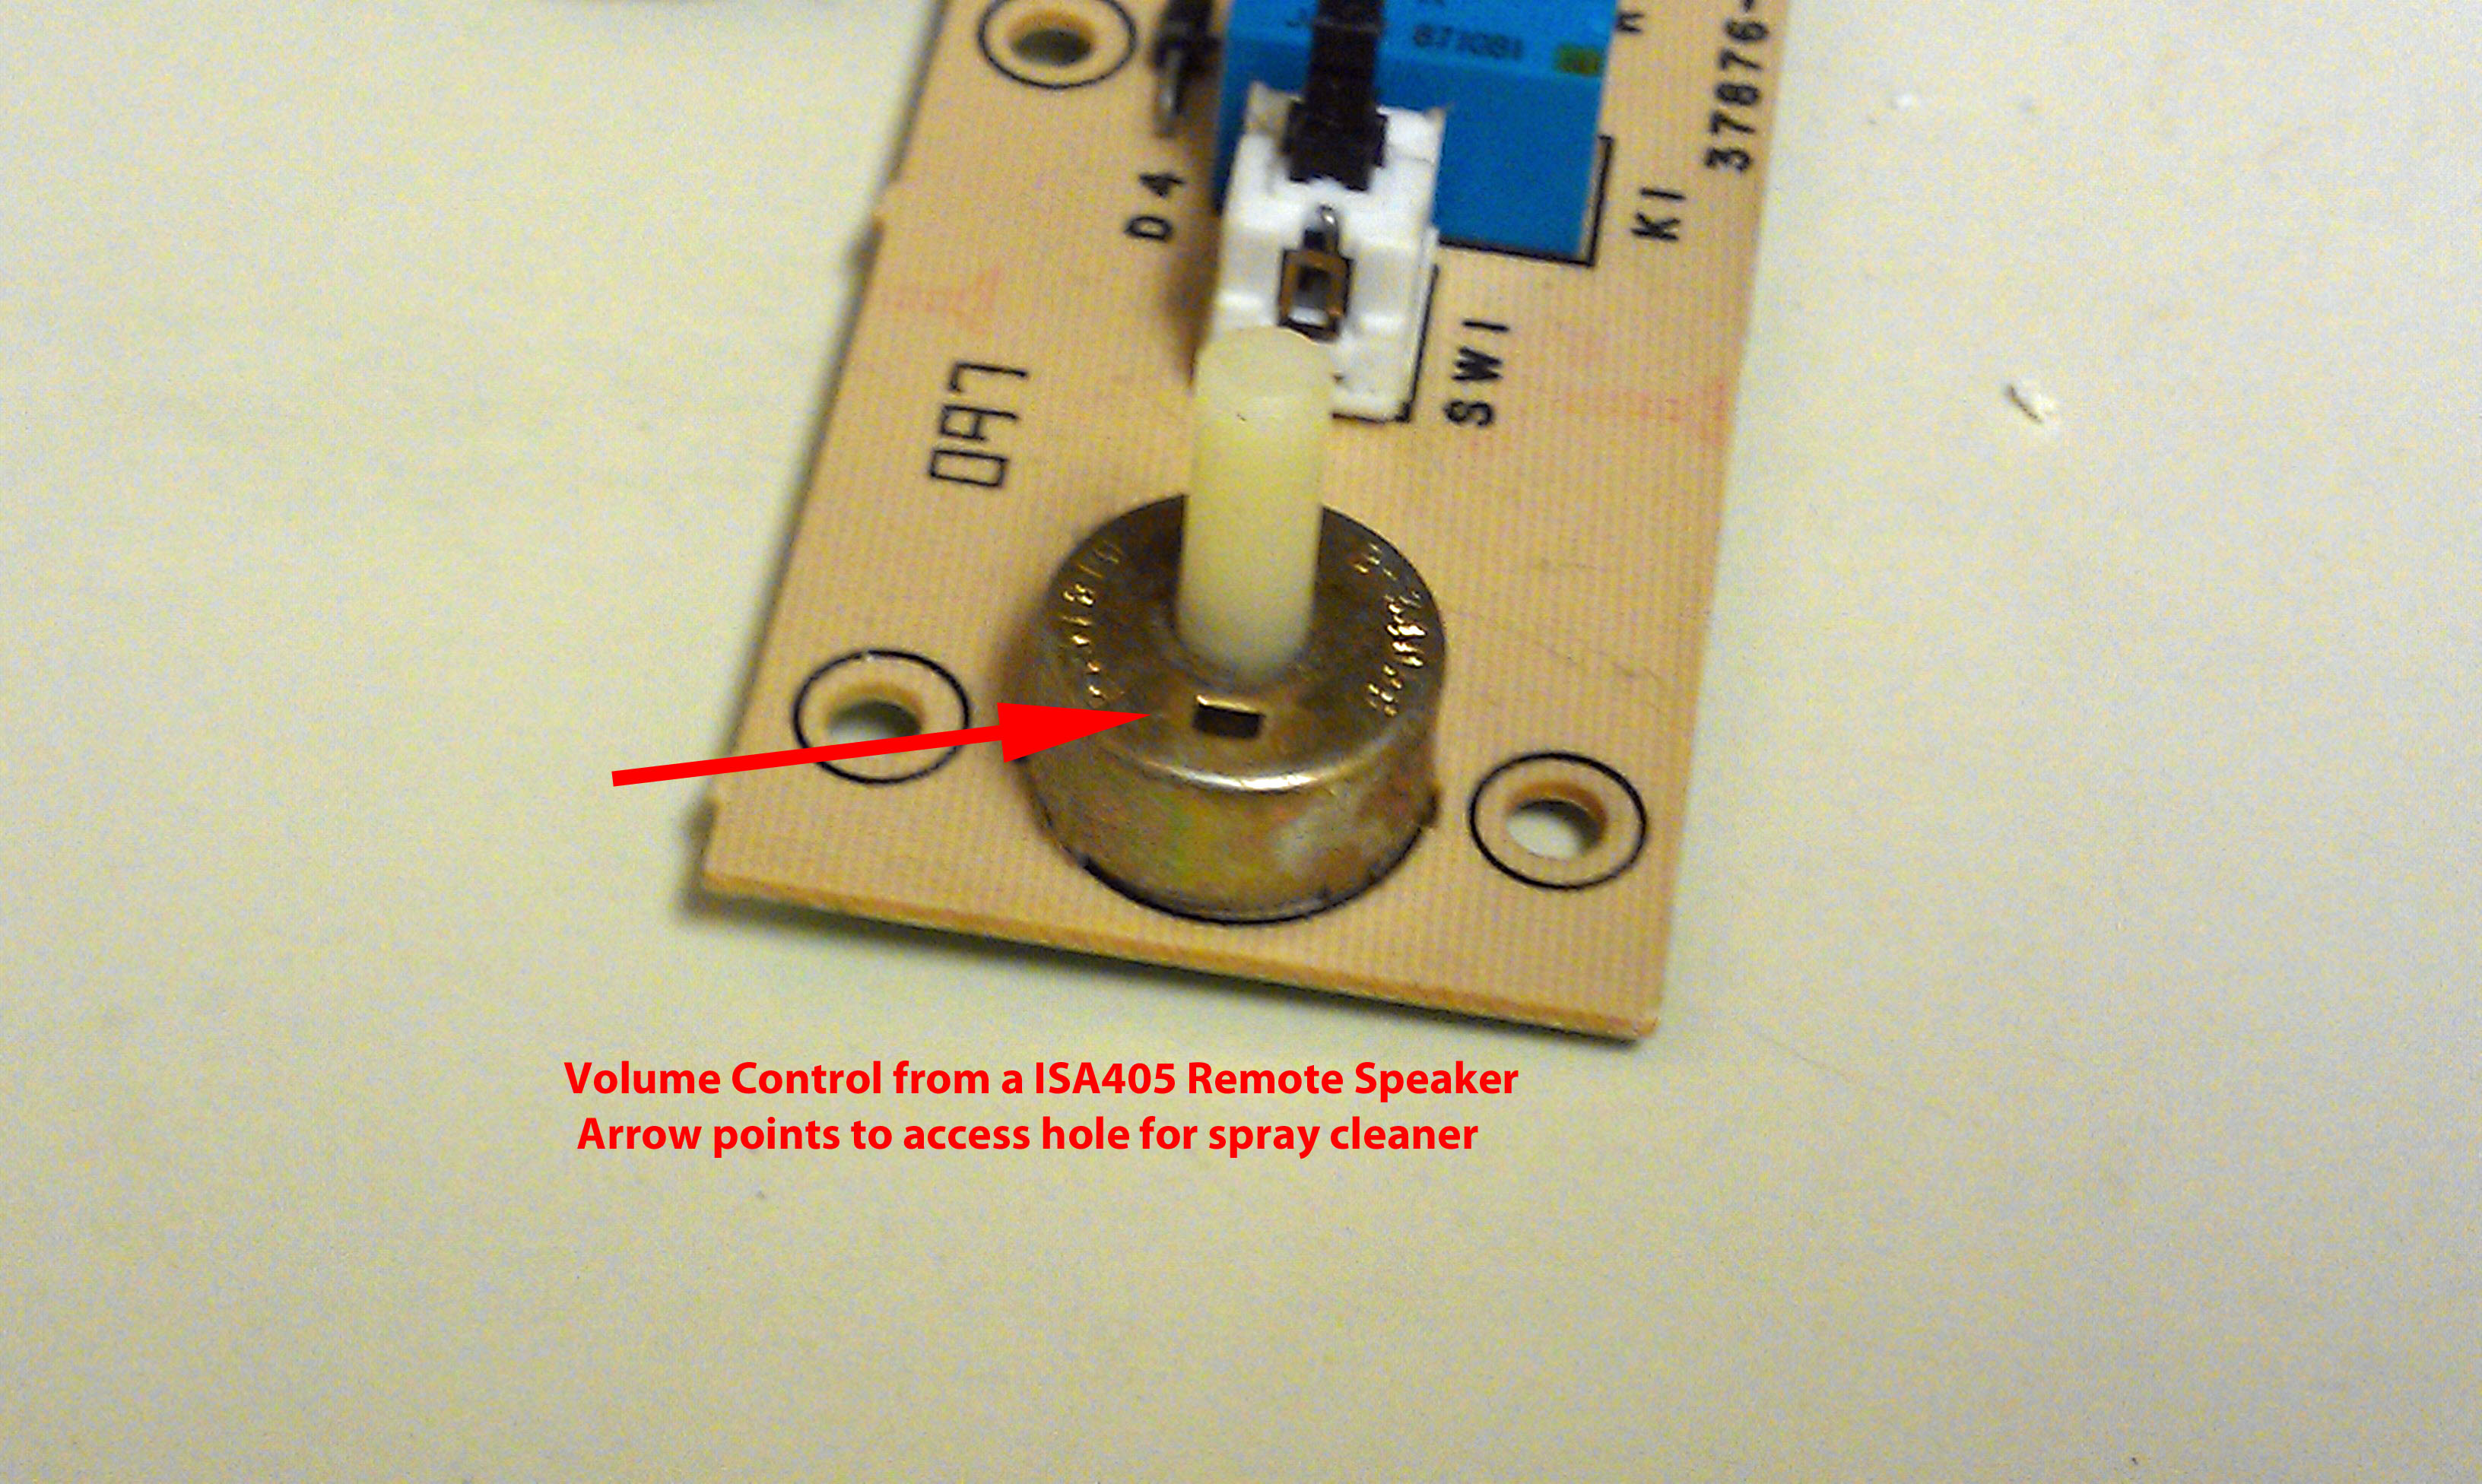
All of this assembly is enclosed inside a metal case, which has holes in it. Over the years, dirt, dust and sheet rock particles filter down the inside of the wall cavity and get into the inside of the volume control.
The dirt and dust builds up a layer over the small wire that wraps the carbon ring. Dirt and dust is an insulator (electricity doesn't go through it). When you turn the volume knob form where it has been set to for the last 12 years, you are moving the metal pad from its clean spot over to a dirty spot.
Since the dirt and dust is an insulator, the pad looses its connection and the sound from the station stops.
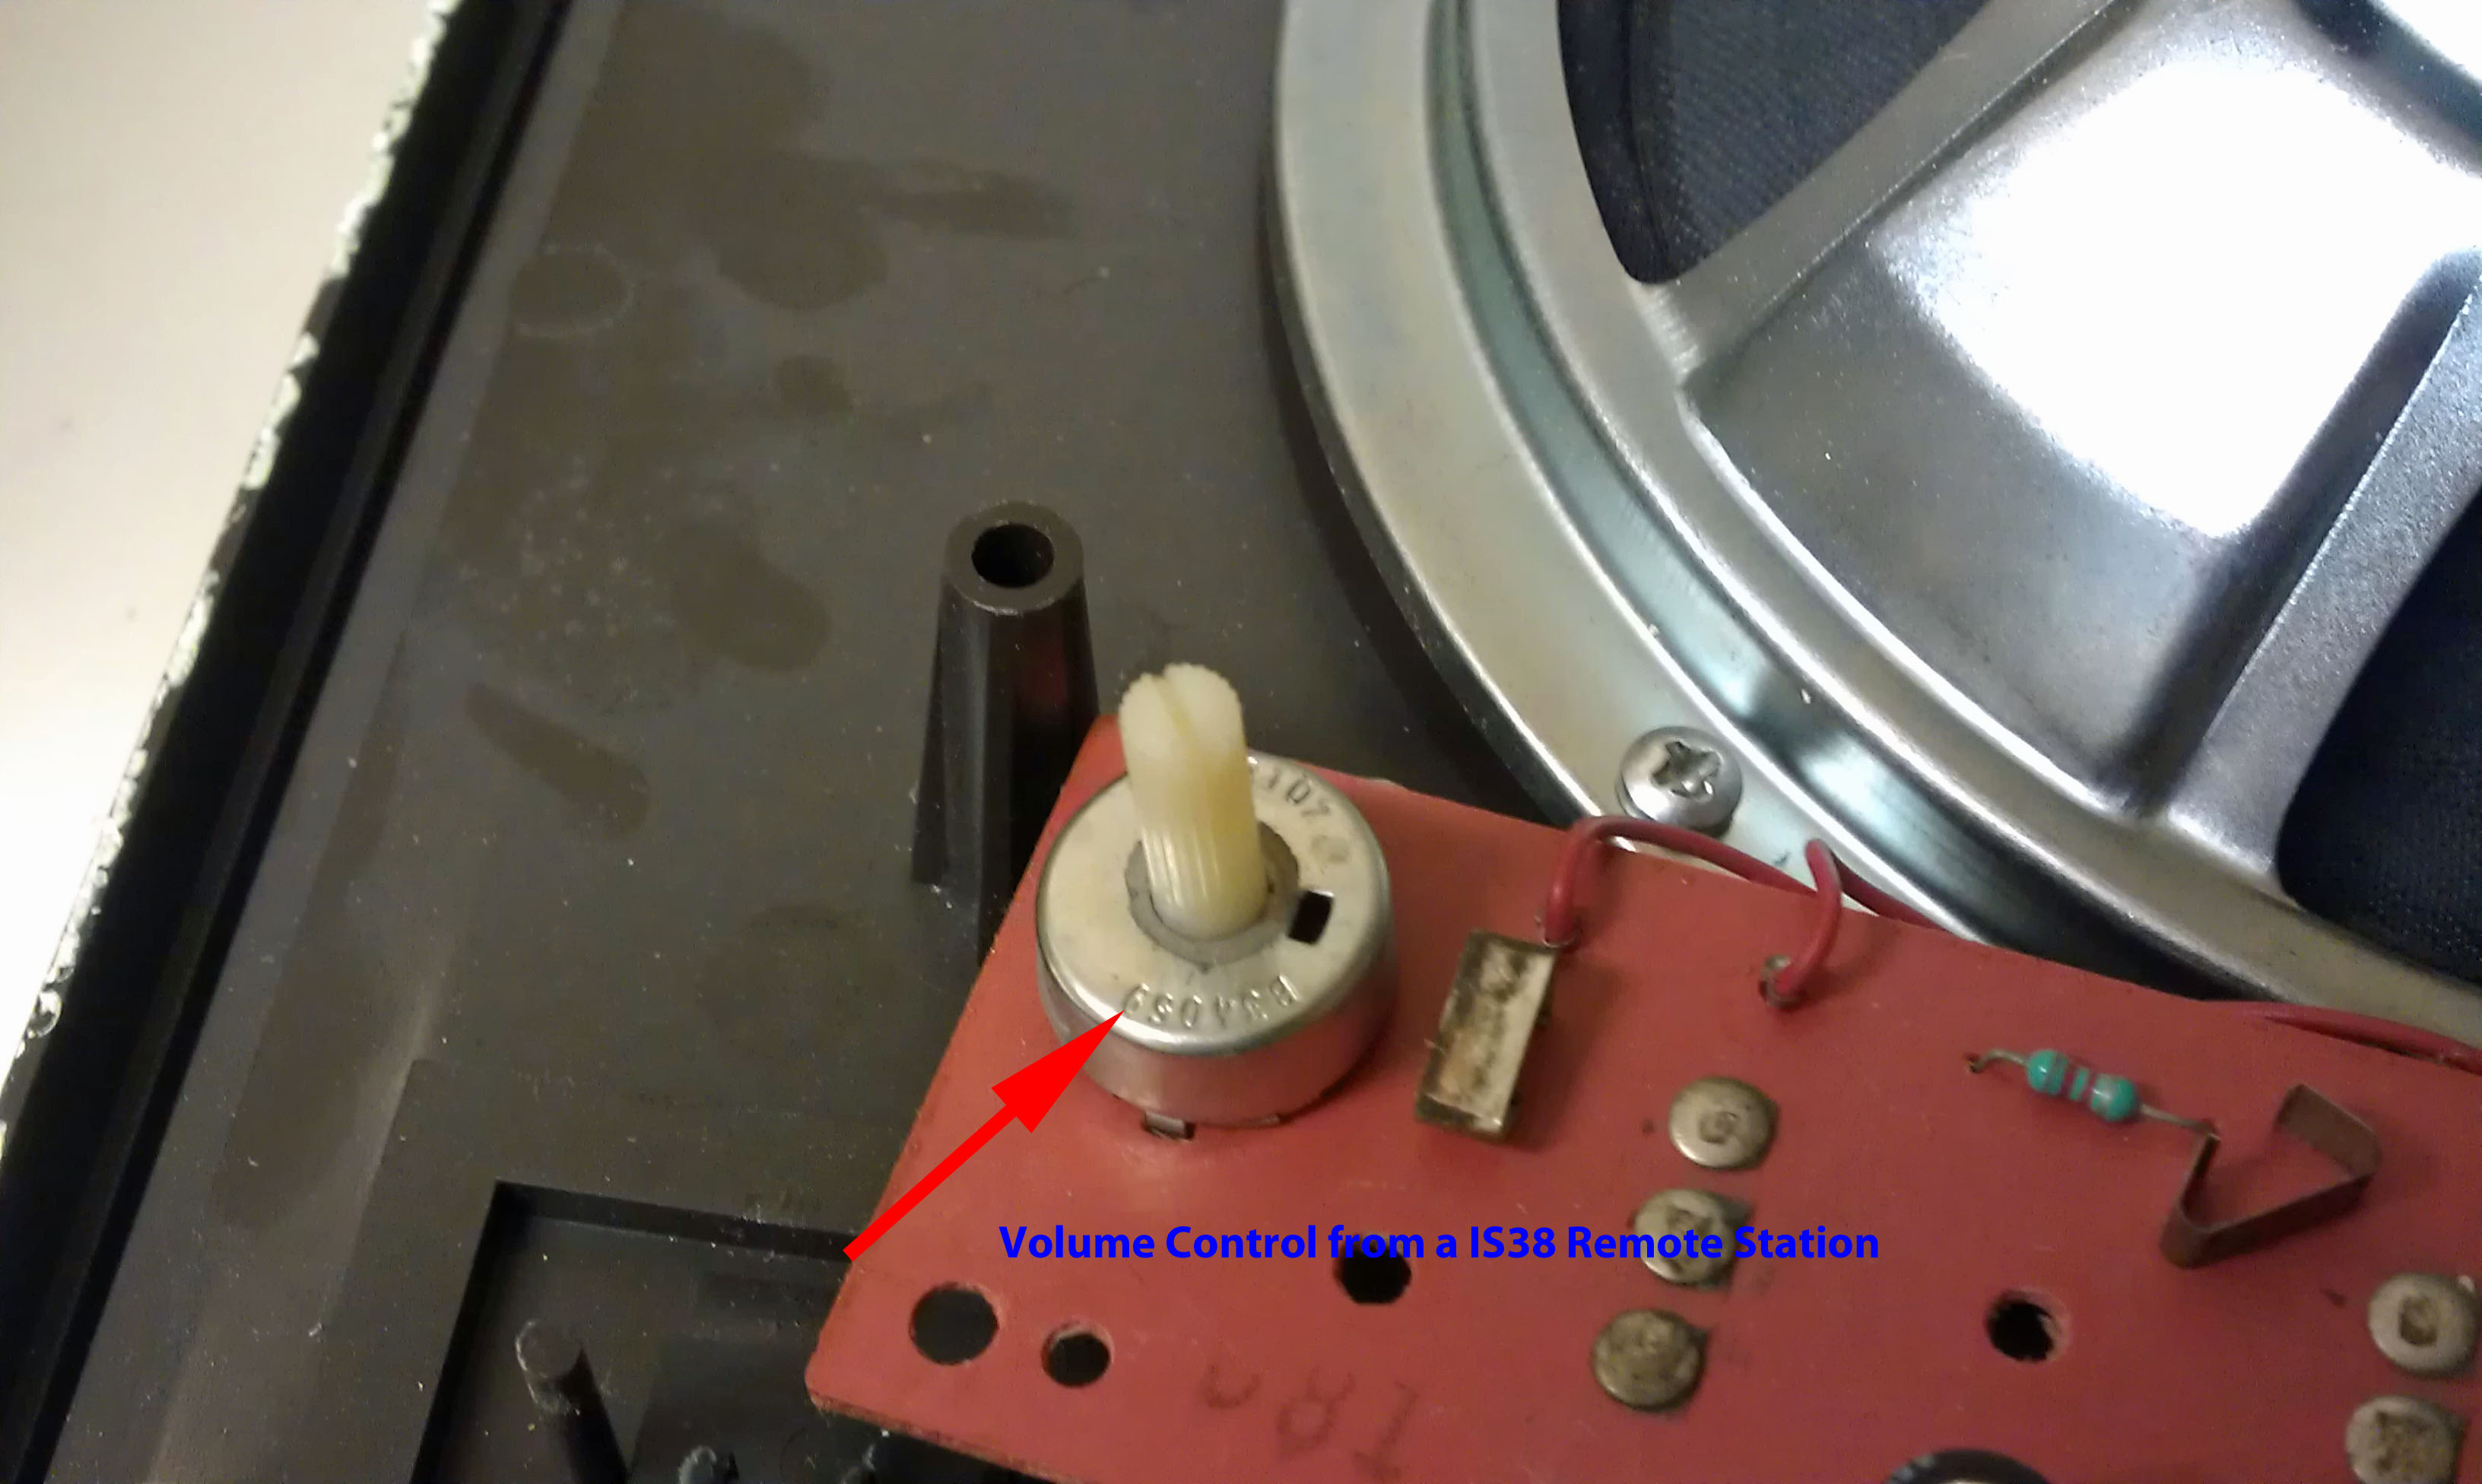
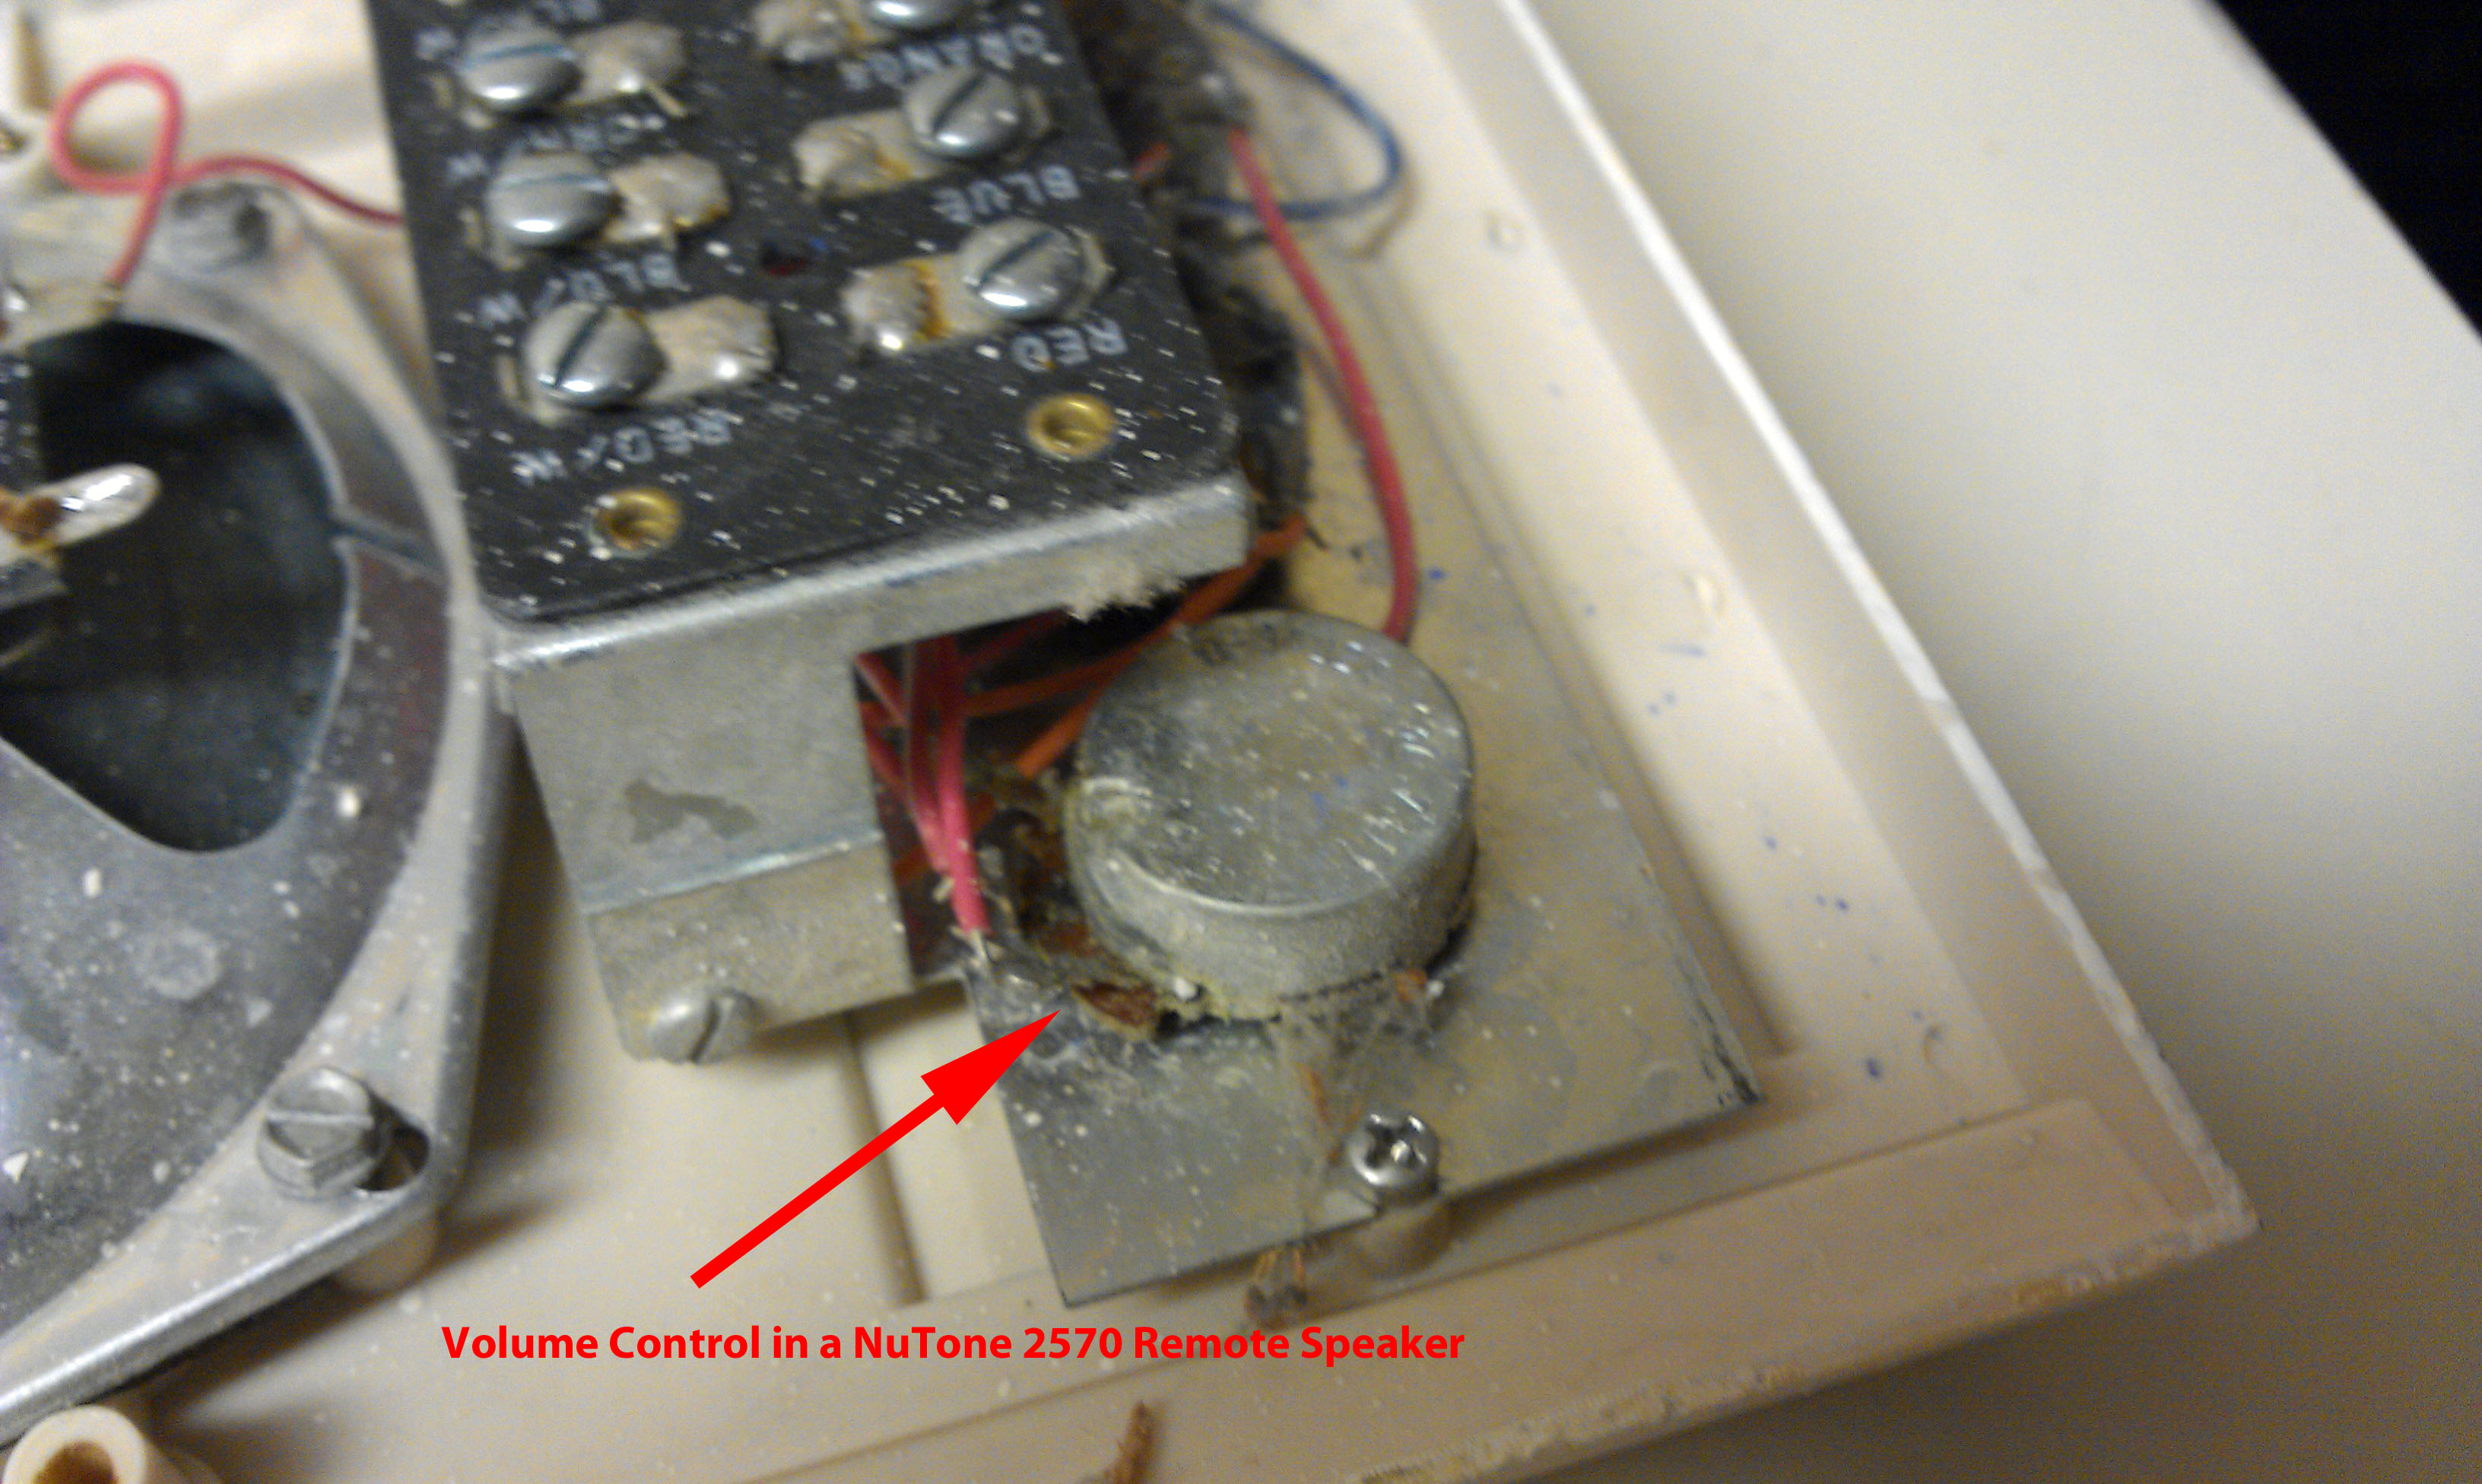
The way NuTone volume controls are designed allows this problem to be corrected by simply turning the volume knob back and forth many times to clean away the dirt and dust. This will solve many intermittent volume related problems.
Sometimes when the volume control is very dirty it will need to be cleaned. You MUST NOT use WD40, carburetor cleaner, TV tuner cleaner, silicon spray or any type of electrical contact cleaner. All of these are the wrong type of cleaners and can shorten the overall life on the volume control or just ruin it. These are all basically solvents which will quickly evaporate and leave the control worse than when you started.

Over the years I have used many different brands of cleaners and I have settled on two products made by the Caig Company. I use DeoxIT D5 to clean the control and I follow it up with DeoxIT Fader F5 to help restore the smoothness of the control.
Cleaning volume controls is a task where less is definitely more. You do not need to “flood” the control with cleaner. The smallest amount sprayed into one of the openings in the case, followed by vigorously turning the volume knob fully back and forth will usually do the job. A second application can always be done if needed.
Why is less more? When the volume control was manufactured it had a small amount of DI-electric jelly (looks like Vaseline) placed inside the control to help prevent corrosion of the small wire-wrapped carbon donut, and to give the control a smooth feel as you turn the knob. Flooding the control with cleaner will wash away the Di-electric and the control will have a rough feel as you turn it and it will corrode more quickly.
After the application of the DeoxIT D5, cleaner a small spray of the Fader F5 will help restore the feel of the control when you turn it. Again, less is more. Just the smallest amount is needed.
This type of cleaning is only typically needed every 8-10 years, more than that has the same effect as using to much cleaner. If you notice that the control becomes a little “scratchy” sounding later on, just turn the control fully back and forth to wipe away the dust and it should be fine.
Now that we have cleaned the volume controls, let's take a look at the intercom control switches on the remote stations.
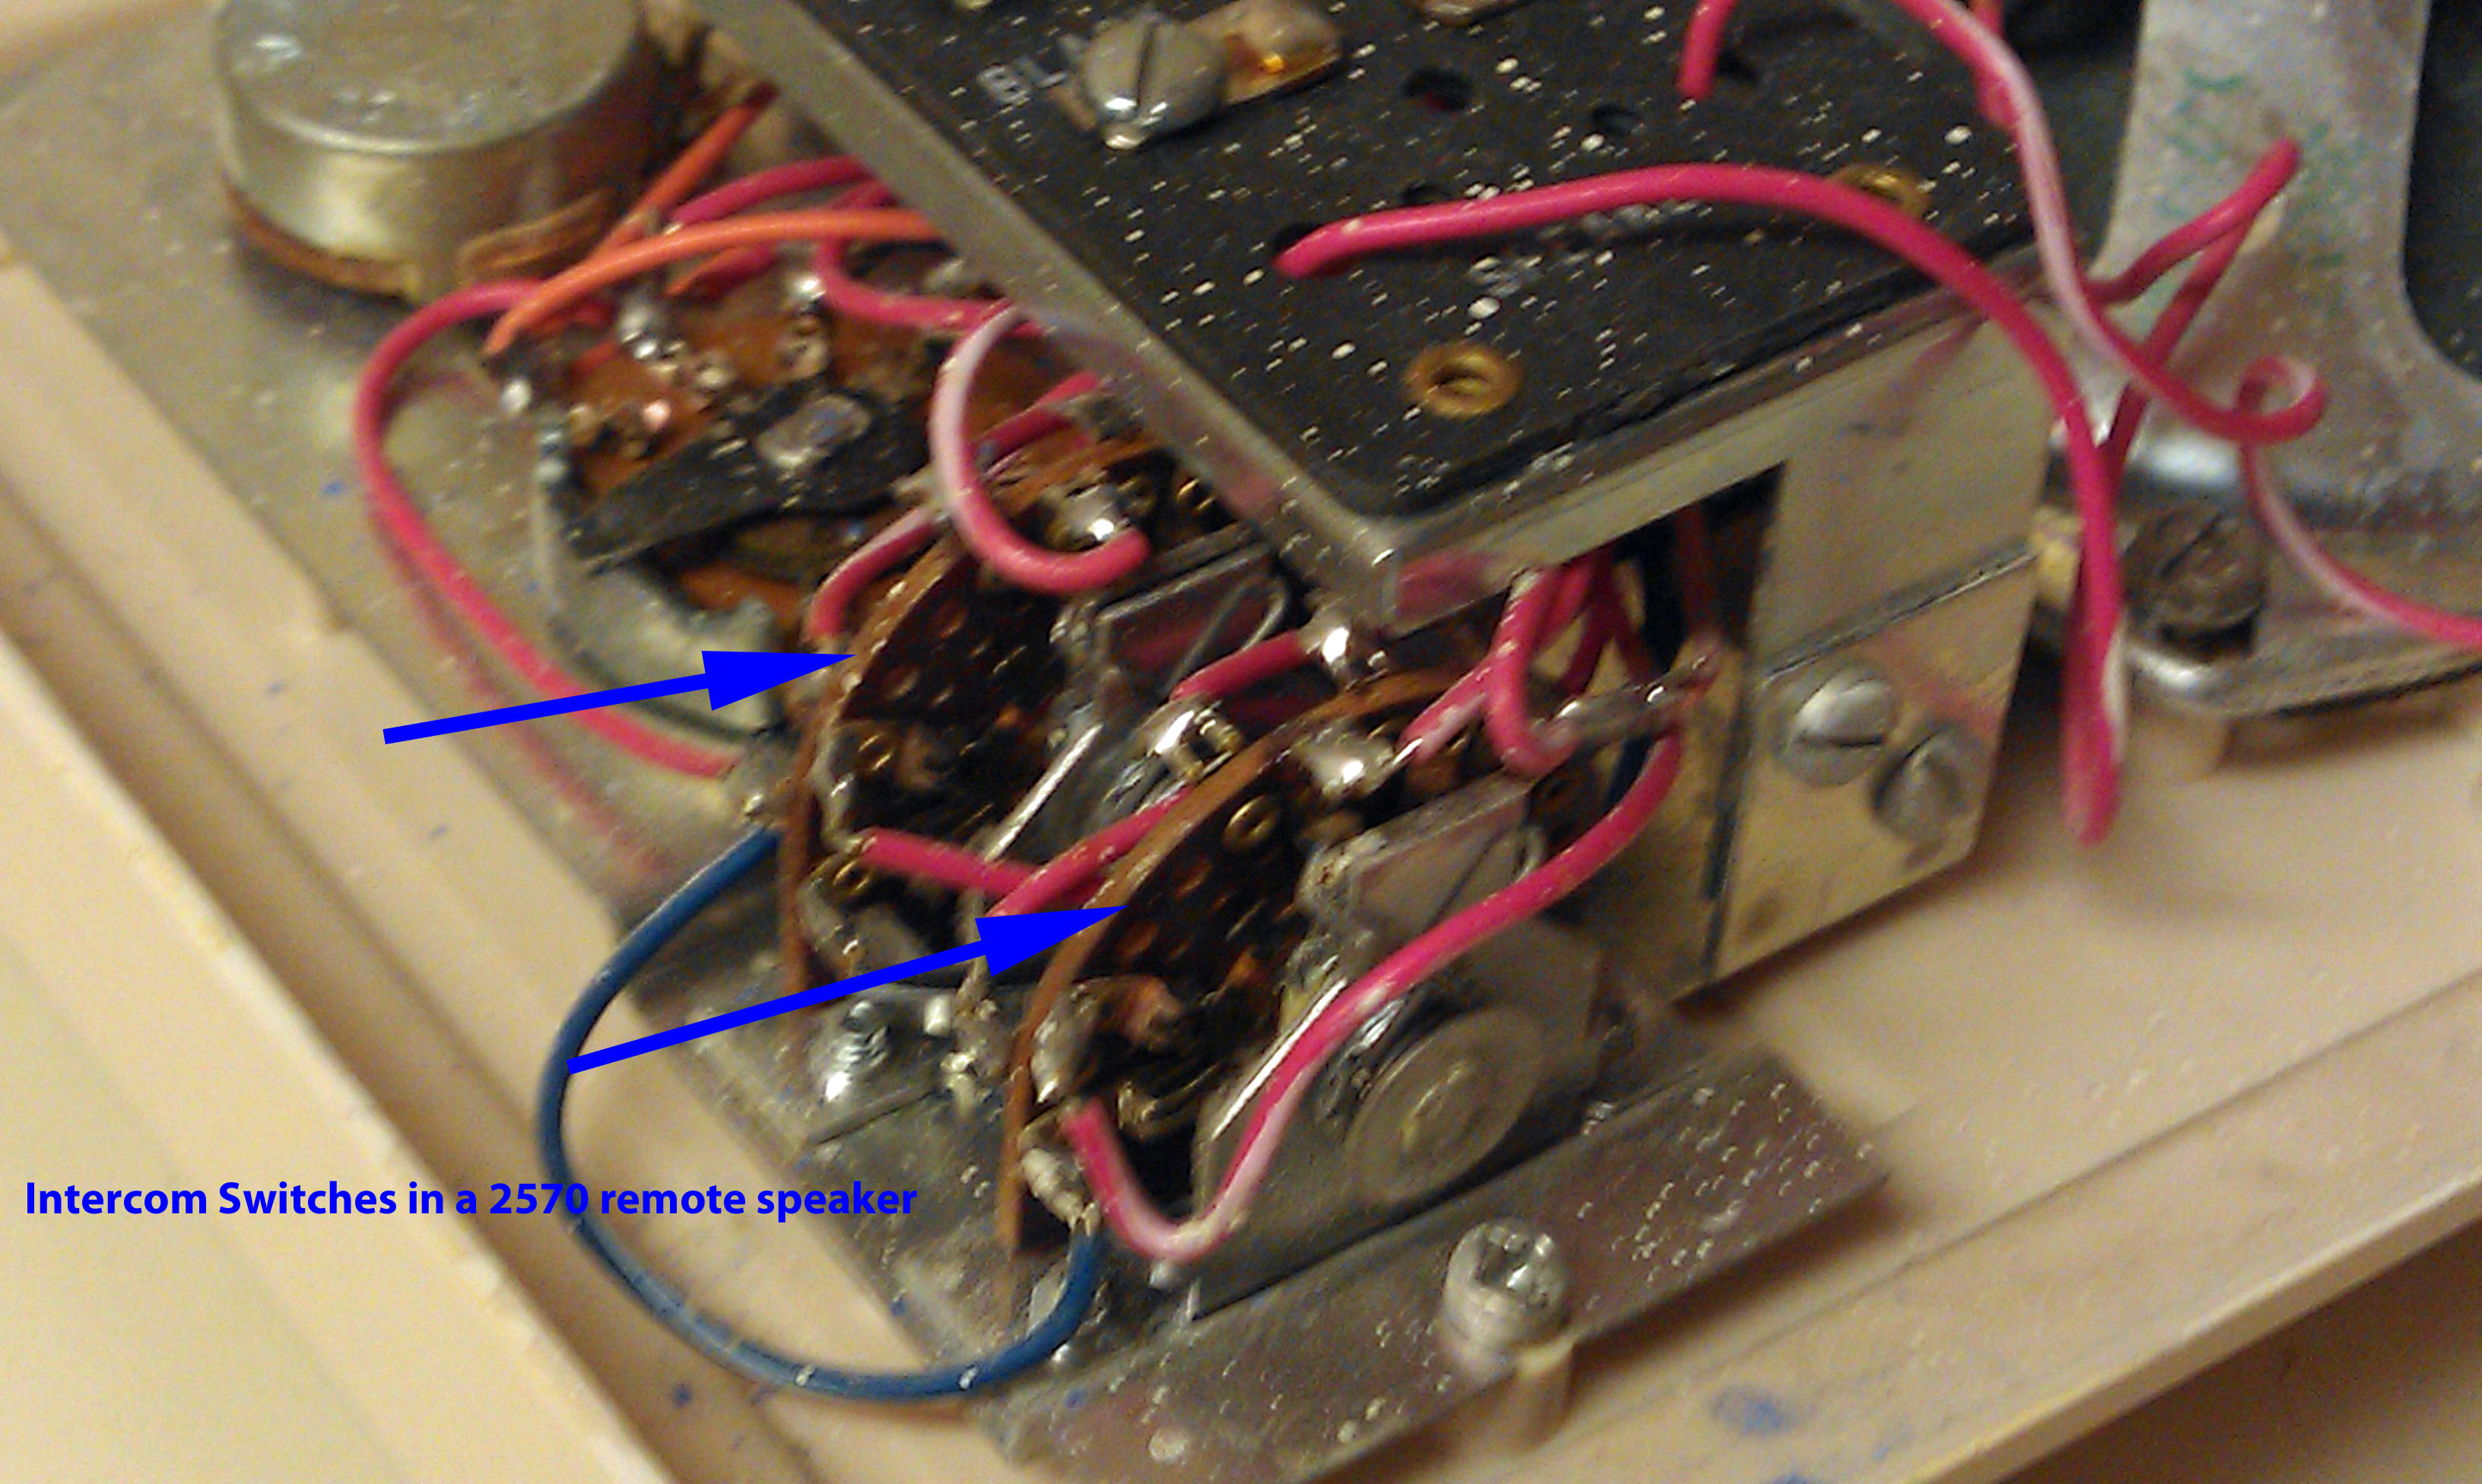
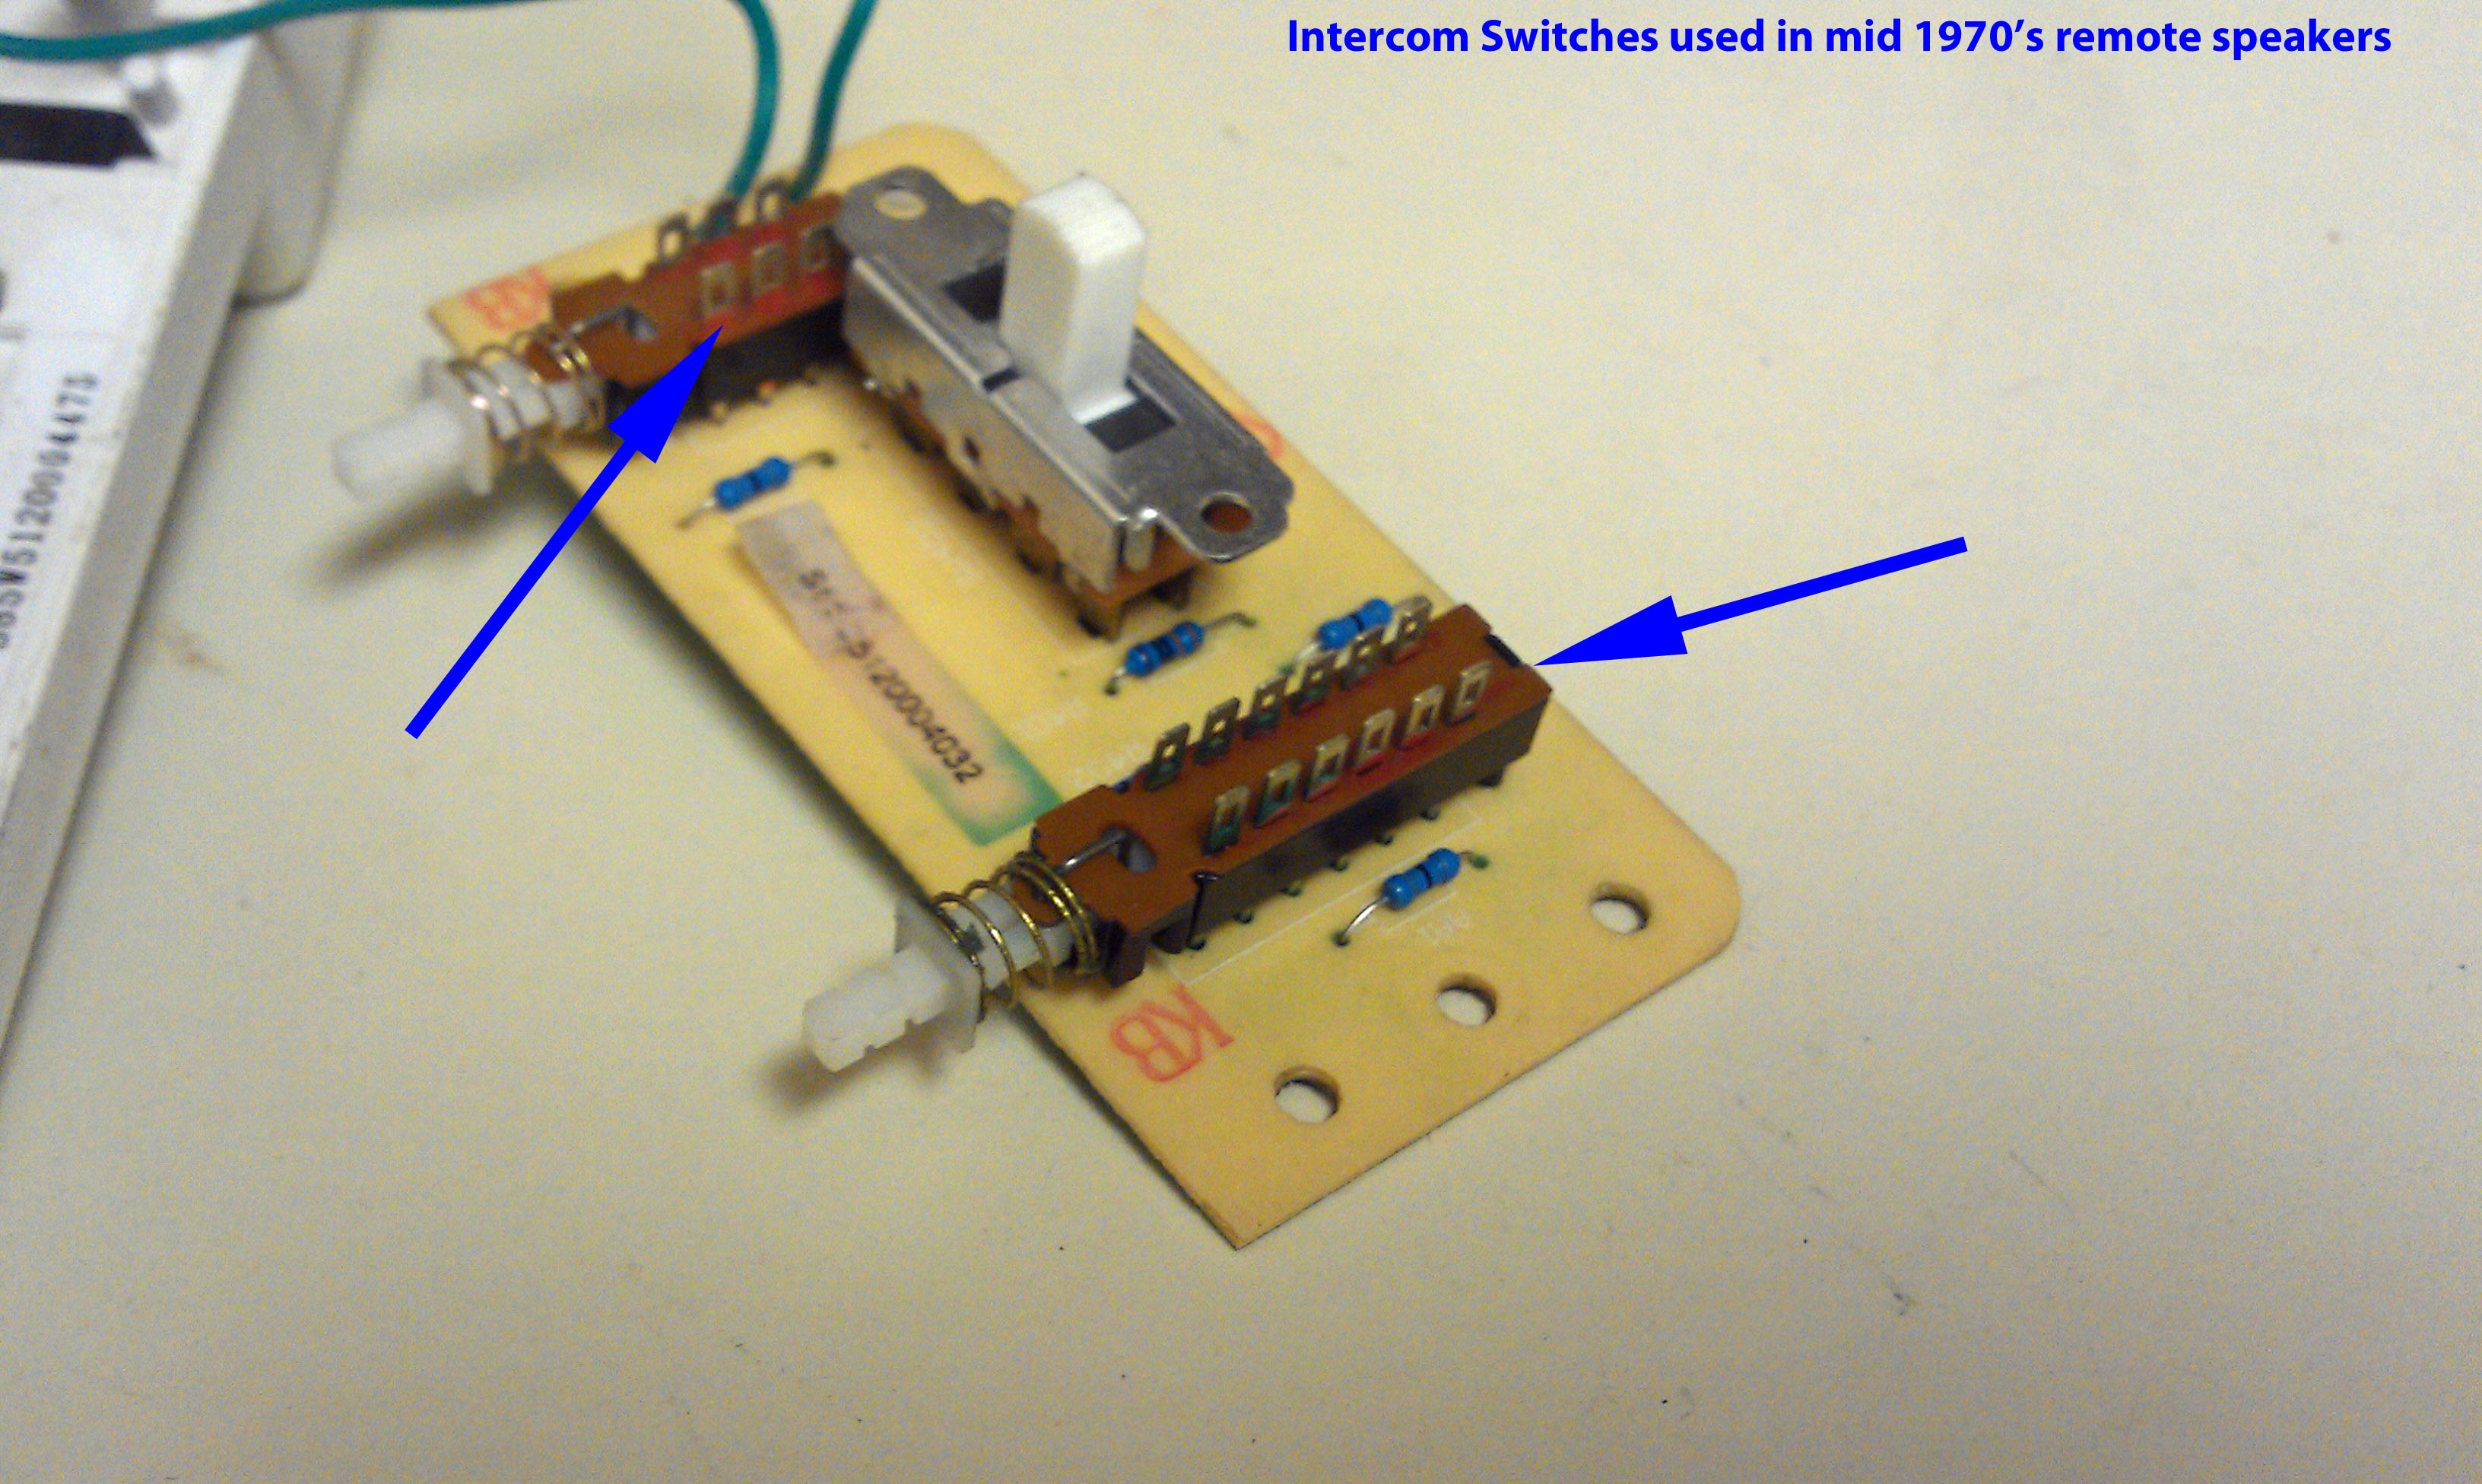
NuTone has used many different types of switches on remote stations over the past 40 years. Even though they differ in design, they all share a common problem. Just like the volume controls, dirt and dust, and especially sheet rock dust, cause many problems with these switches.
The typical symptom of dirty and worn control switches is a loud “scratchy” noise that you hear through the intercom system when a switch is operated.
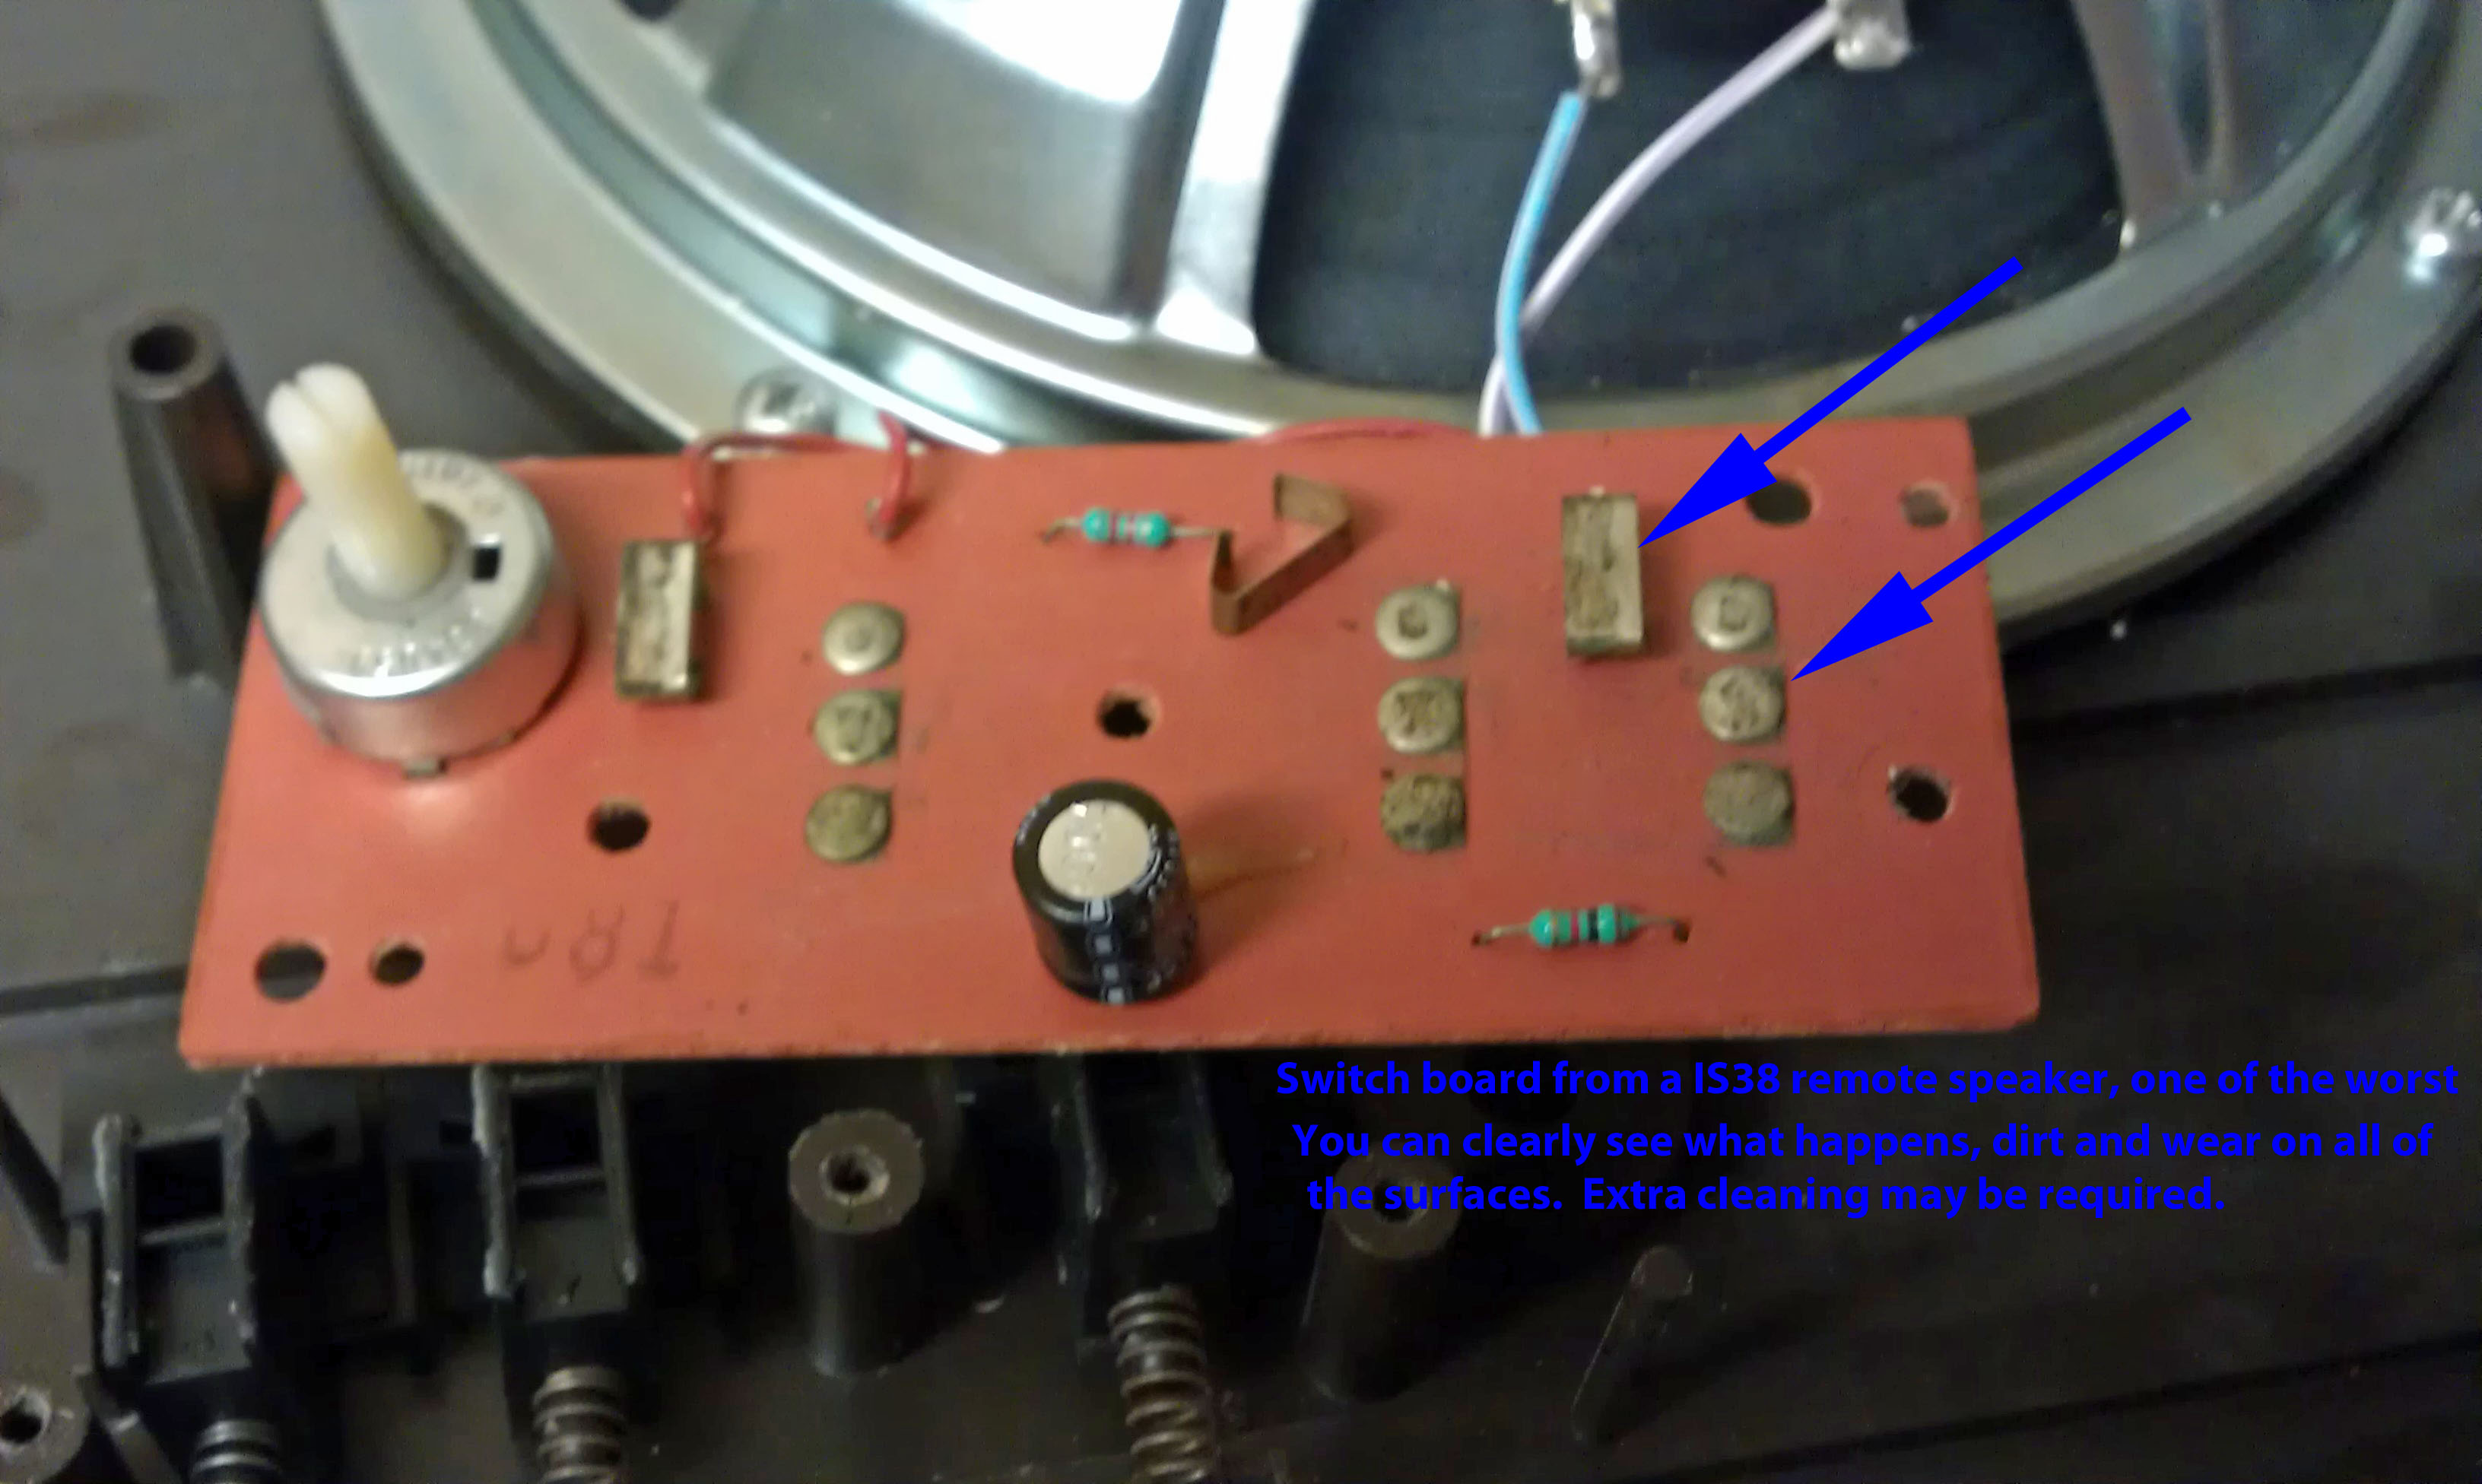
This noise is caused by the contact surface of the switch being scratched by the dirt and dust that gets inside the switch over the years. When the switch was new, the metal surfaces inside the switch were clean and polished and ultra-smooth. When you operated the switch, the metal surfaces could slide across each other easily and everything was perfect.
Over the years dirt and sheet rock dust get inside the switch and coat the metal surfaces. When you operate the switch, the metal surfaces slide across each other along with the dirt, and the dirt scratches the metal surface.
Now the metal surface is scratched. When the switch is operated, instead of clean, polished surfaces sliding past each other, it's more like rubbing 2 pieces of sand paper together. The surfaces are rough (on a microscopic level) and the “scratchy” noise you hear is the electricity moving across the rough surface.
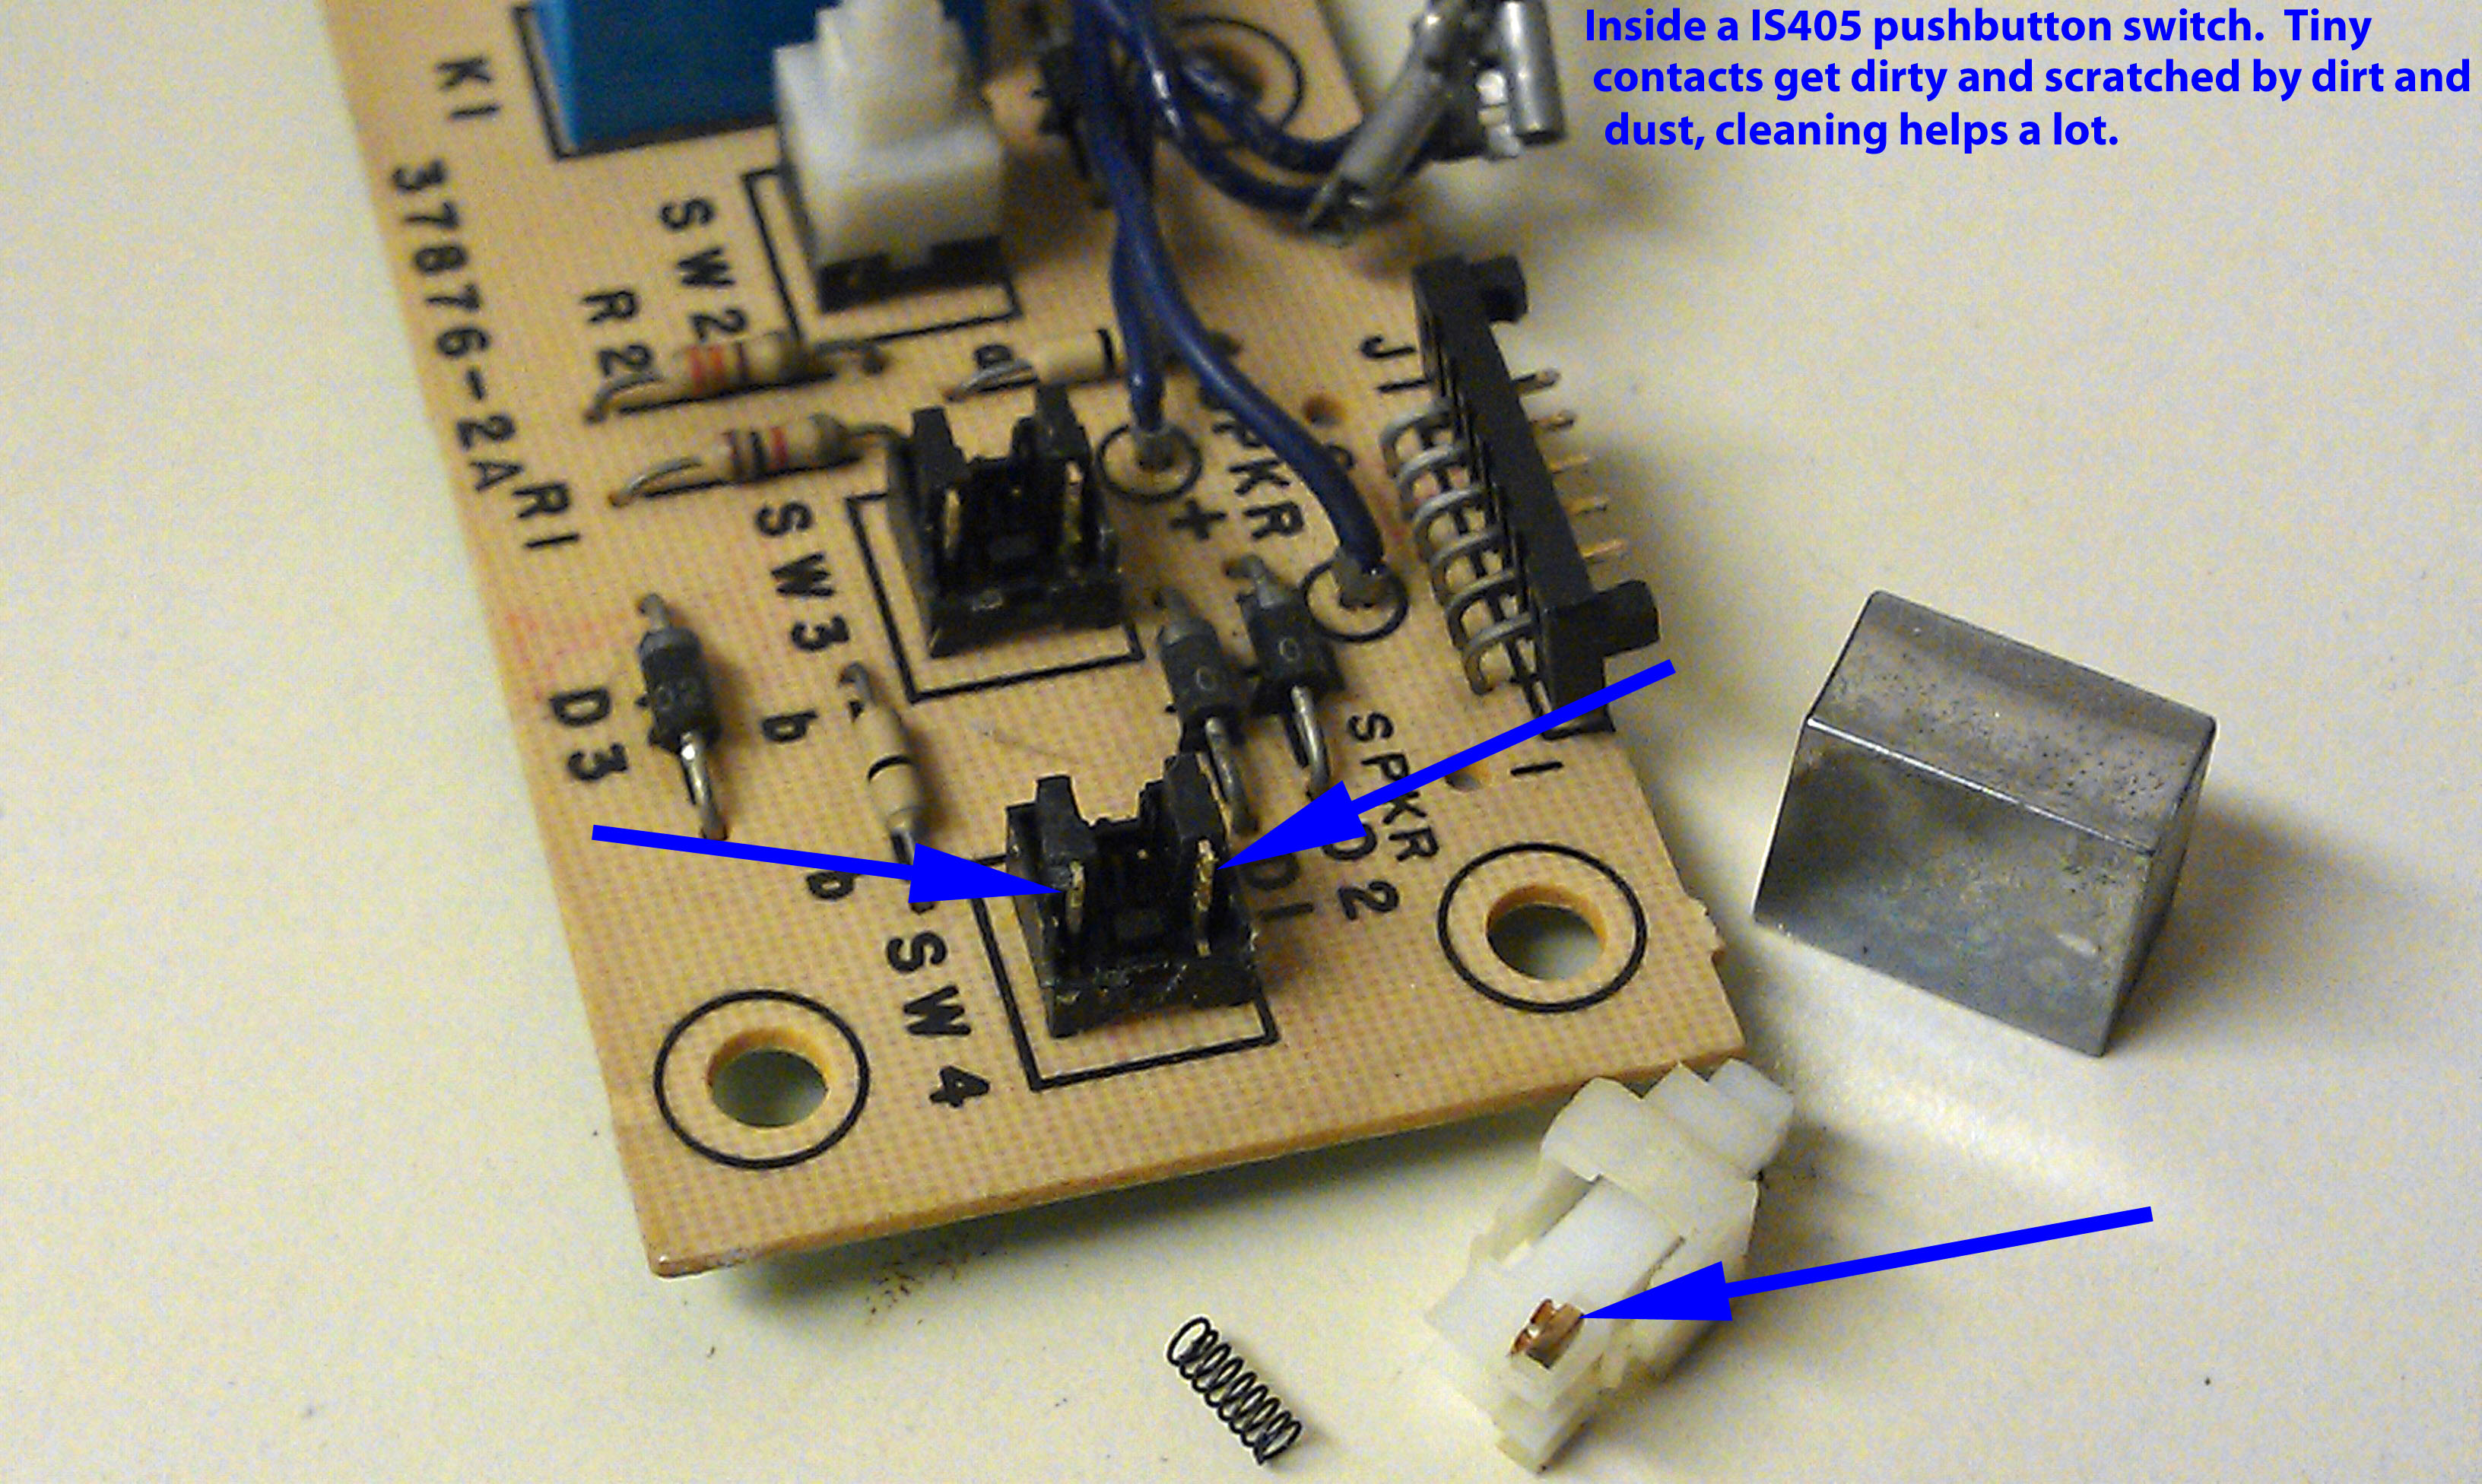
While there isn't a permanent solution for scratchy switches (short of replacing the switch with a new part) cleaning the switch will help a lot. You can use the same cleaners as the volume controls. Simply spray the switch with just a little D5 and work the switch until it improves. You may need to use several applications because getting the cleaner inside the switch can be more difficult than the volume controls.
I have cleaned systems that were basically unusable due to dirty volume controls and switches and often these system can be restored to 70%-80% of new with some careful cleaning.
Cleaning outdoor Patio stations is the same as cleaning inside stations, except Patio stations are often in much worse condition. Having been outside in the weather takes a real toll on equipment and even the best cleaning job will not always restore a Patio station.
 Cindy & Christopher
OUTDOOR STATIONS: ENTRY DOOR & PATIO STATIONS
Now that you have your system adjusted correctly, and you have cleaned all of the volume controls and intercom push buttons, it's time to take a look at the condition of your outdoor speakers.
Outdoor NuTone speakers are located at an entry door or on a patio or deck. Entry door speakers will either be just a grill with a speaker located behind the grill, or it may also have a door bell pushbutton on the grill.
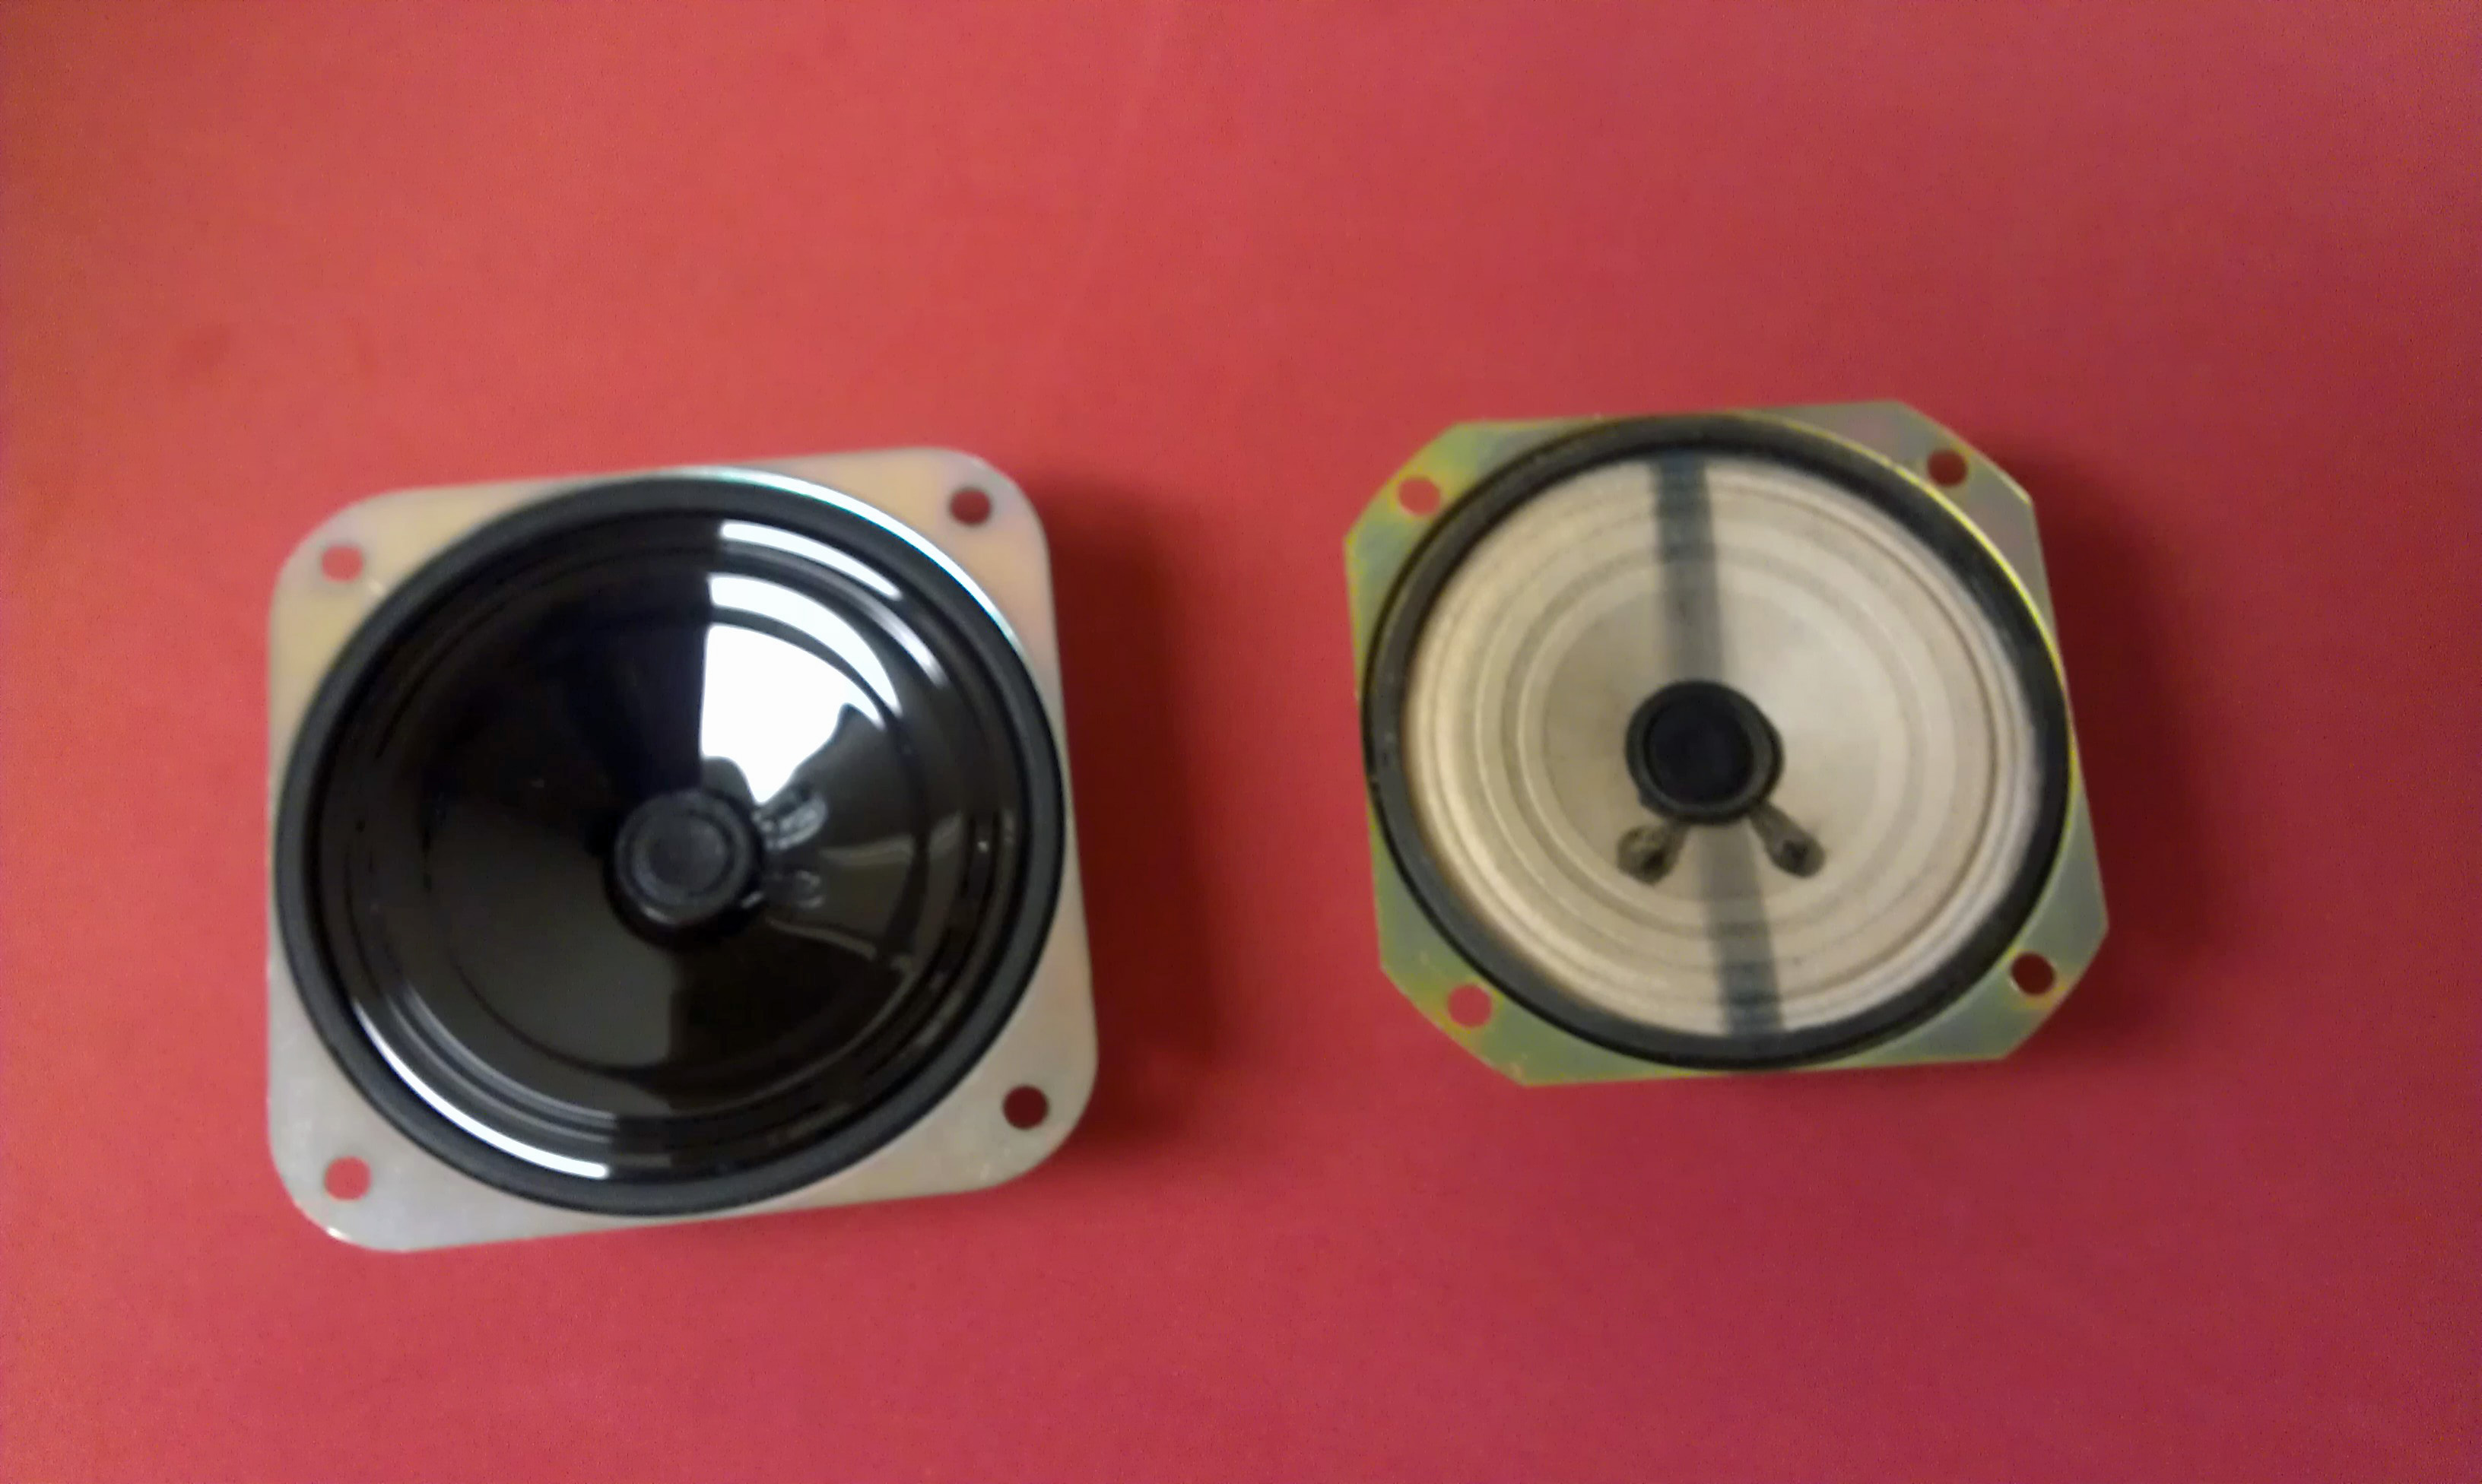
Older NuTone entry door speakers used to have paper speaker cones inside a metal frame. Over the years, the paper would rot away from the sun and rain and sometimes little insects would eat the paper. Starting in the late 1980's, the paper cones were changed to plastic, which improved their longevity.
Even with plastic cones the speaker can still fail. Replacing door speaker cones is easy. They are all 3-1/2” square 16 ohm speakers and are commonly available from any NuTone Service Center. All you have to do is remove the grill from the wall housing, turn it over, remove the 2 wires from the speaker terminals, and remove the 2 or 4 screws that hold the speaker to the back of the grill. Reassemble in reverse order, and you're done.
Patio stations come in several different configurations. The earliest patio stations were all 2 piece designs. On the outside wall there will be a small recessed panel which has both the volume control and intercom pushbuttons on it. Higher up on the same wall will be a large 12” x 12” aluminum grill with a speaker cone behind it.
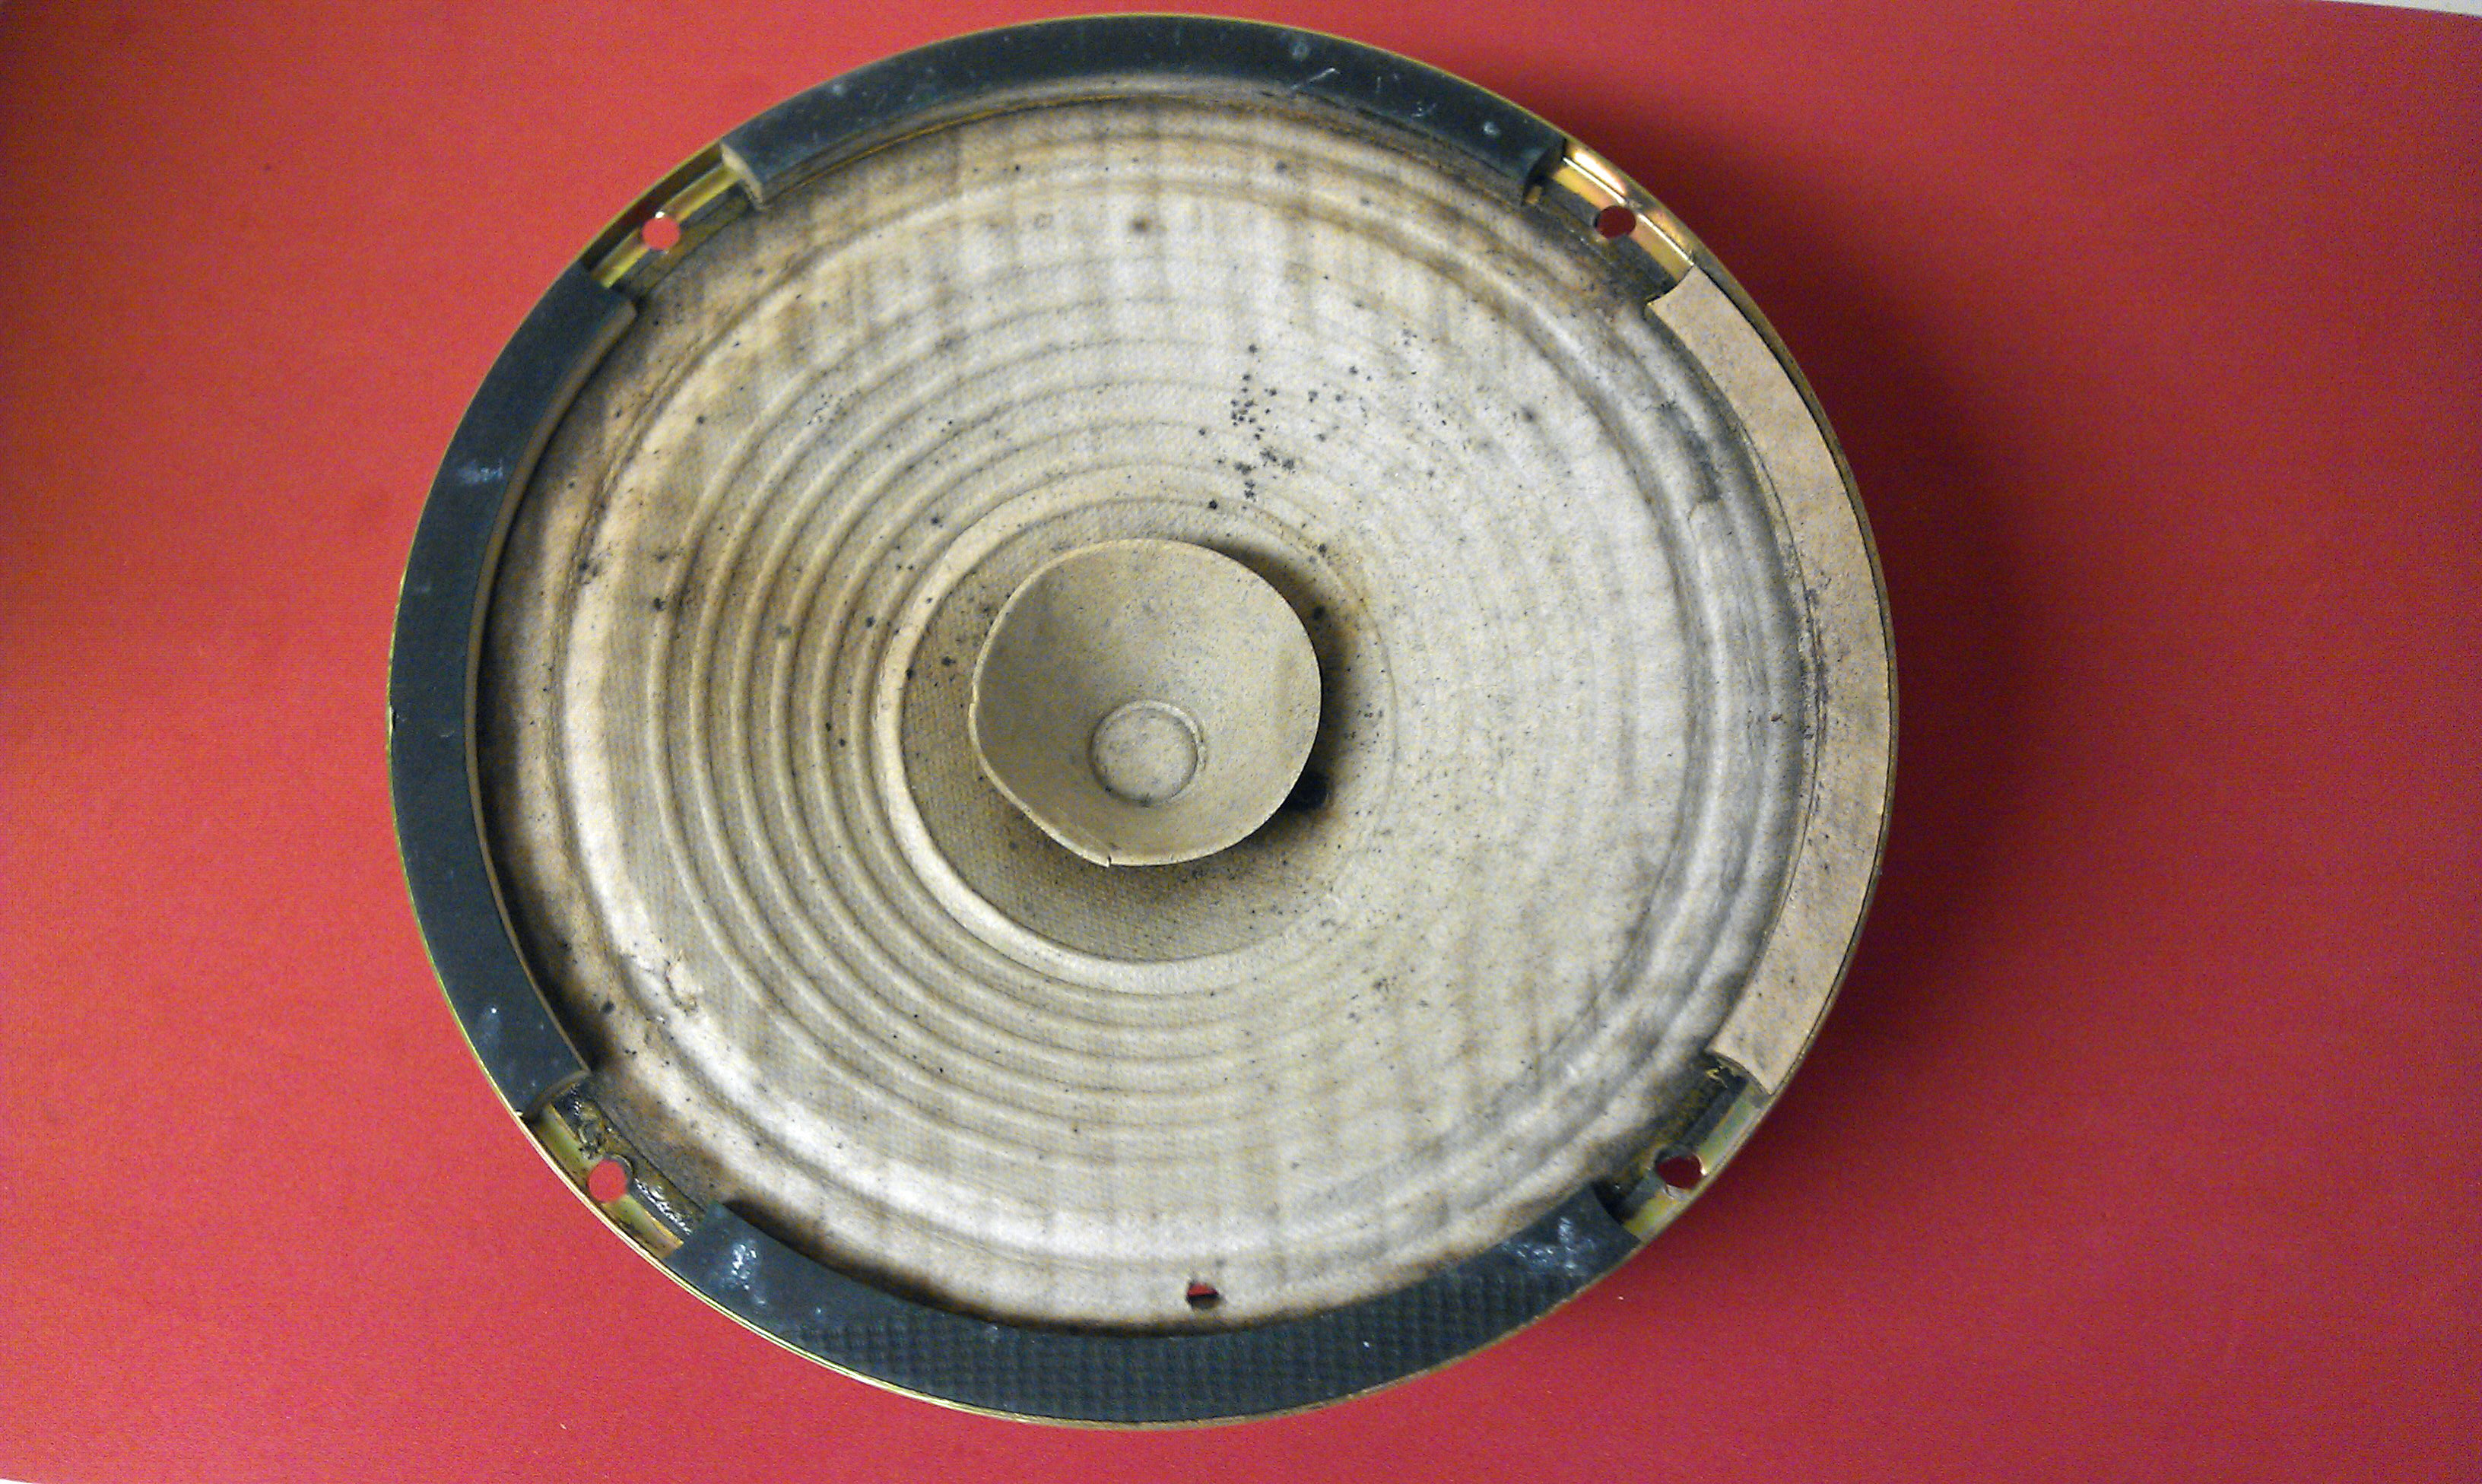
The speaker cone behind the grill will be either a paper-coned speaker or it might be made from a piece of flat Styrofoam. These were call Poly Planar speakers and they last almost forever. All of these cones are 8” diameter.
Starting in the 1970's, a smaller one piece patio station was introduced. It is usually an outdoor version of the same size station from inside the house. These use 5” diameter speaker cones.
Let's look at NuTone speaker cones throughout their history. Speaker cones have a rating in Ohms. This is the impedance of the speaker and it is important. The original NuTone speakers cones were 3.2 ohms, then systems changed and used 45 ohm speakers, then systems changed again and speakers became 25 ohms. You may notice that none of these ratings are 4 or 8 ohms, which are used in home stereo systems.
It is important to have the correct impedance speaker for your system. If you use the wrong speaker it can make you system operate incorrectly, or even cause the master station amplifier to fail.
Replacing speaker cones is easy and will restore your system to full operation. If you have a multi-meter, you can check the impedance of the speaker cone by first removing the wires that are connected to the speaker, and then connect the meter to the terminals. The reading should match the rating stamped on the speaker magnet. If you get a reading of 0 or infinity, the speaker cone has failed.
 Use this Button to find out about Replacement Patio Speaker Cones
Basic Troubleshooting & Wire Types
A common problem with many NuTone intercom systems is that 1 or 2 of the stations on a system will not work correctly. Maybe the volume is low or the intercom functions don't work properly. This may be a problem with the station itself or it can be a problem with the wiring.
A simple way to determine what is causing the problem is to swap the troublesome station with another station in the house that works correctly. If the problem follows the suspect speaker, then the speaker is the problem. If the problem remains in the original location, the it might be a wiring problem.
When swapping speakers around, you must take notice of how the wiring is connected. You may have 3, 4, 5, 6 or 8 wires connected to the back of the speaker. NuTone Intercom systems were designed to be easy to install, even by the do-it-your-selfer. All of the wire connections will be labeled either by the color of the wire, or in the case of 3-wire systems, by the actual metal inside the insulation.
On 3-wire systems, the cable is a flat, gray 3-conductor ribbon wire. Inside the insulation you will find that the wires themselves are different colors. #1 is silver (this is used to index the side of the wire you start from), #3 is copper, and that only leaves the center wire (which is also copper, but it's in the center of the cable).
If you look at the back of any early 3-wire station, you will find molded into the plastic “Silver”, “Center”, “Copper” and arrows that point to the screws where the wires connect.
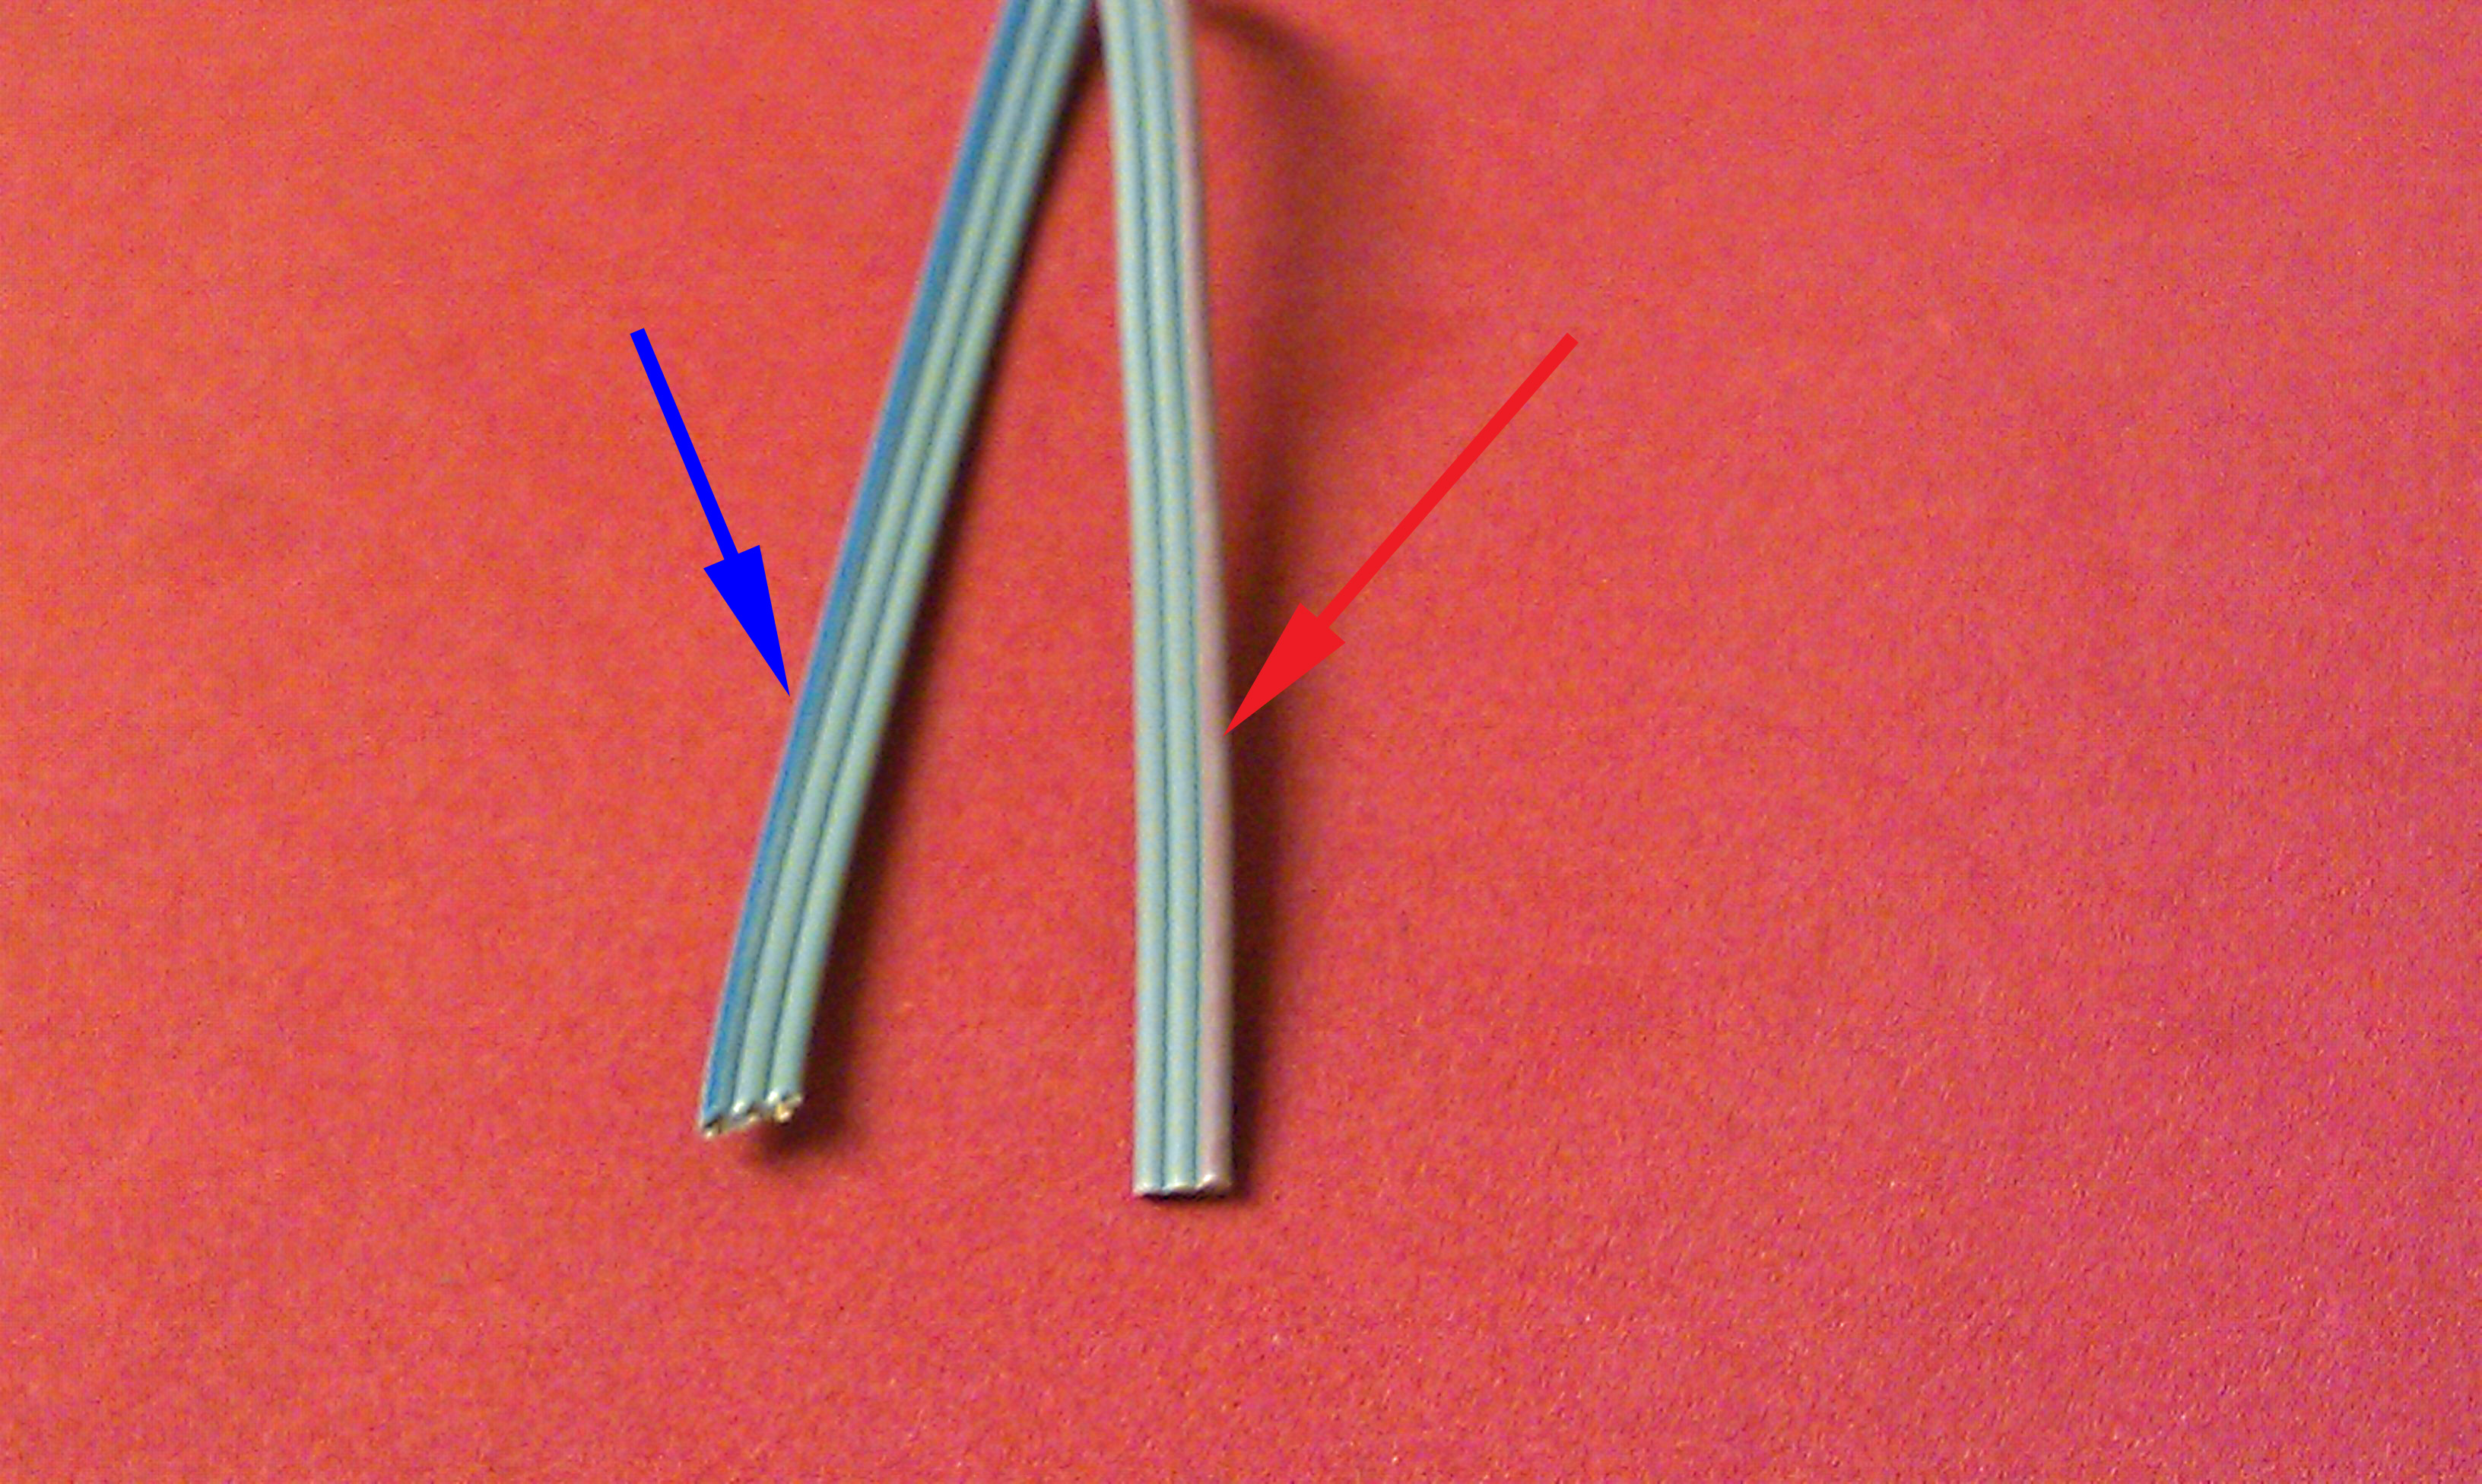
Later, NuTone added a red stripe to wire #1 (silver) and a blue stripe to wire #3 (copper) to make it easier. You will find stations labeled as “red/silver”, “Center” and “Blue/Copper” on stations from then on.
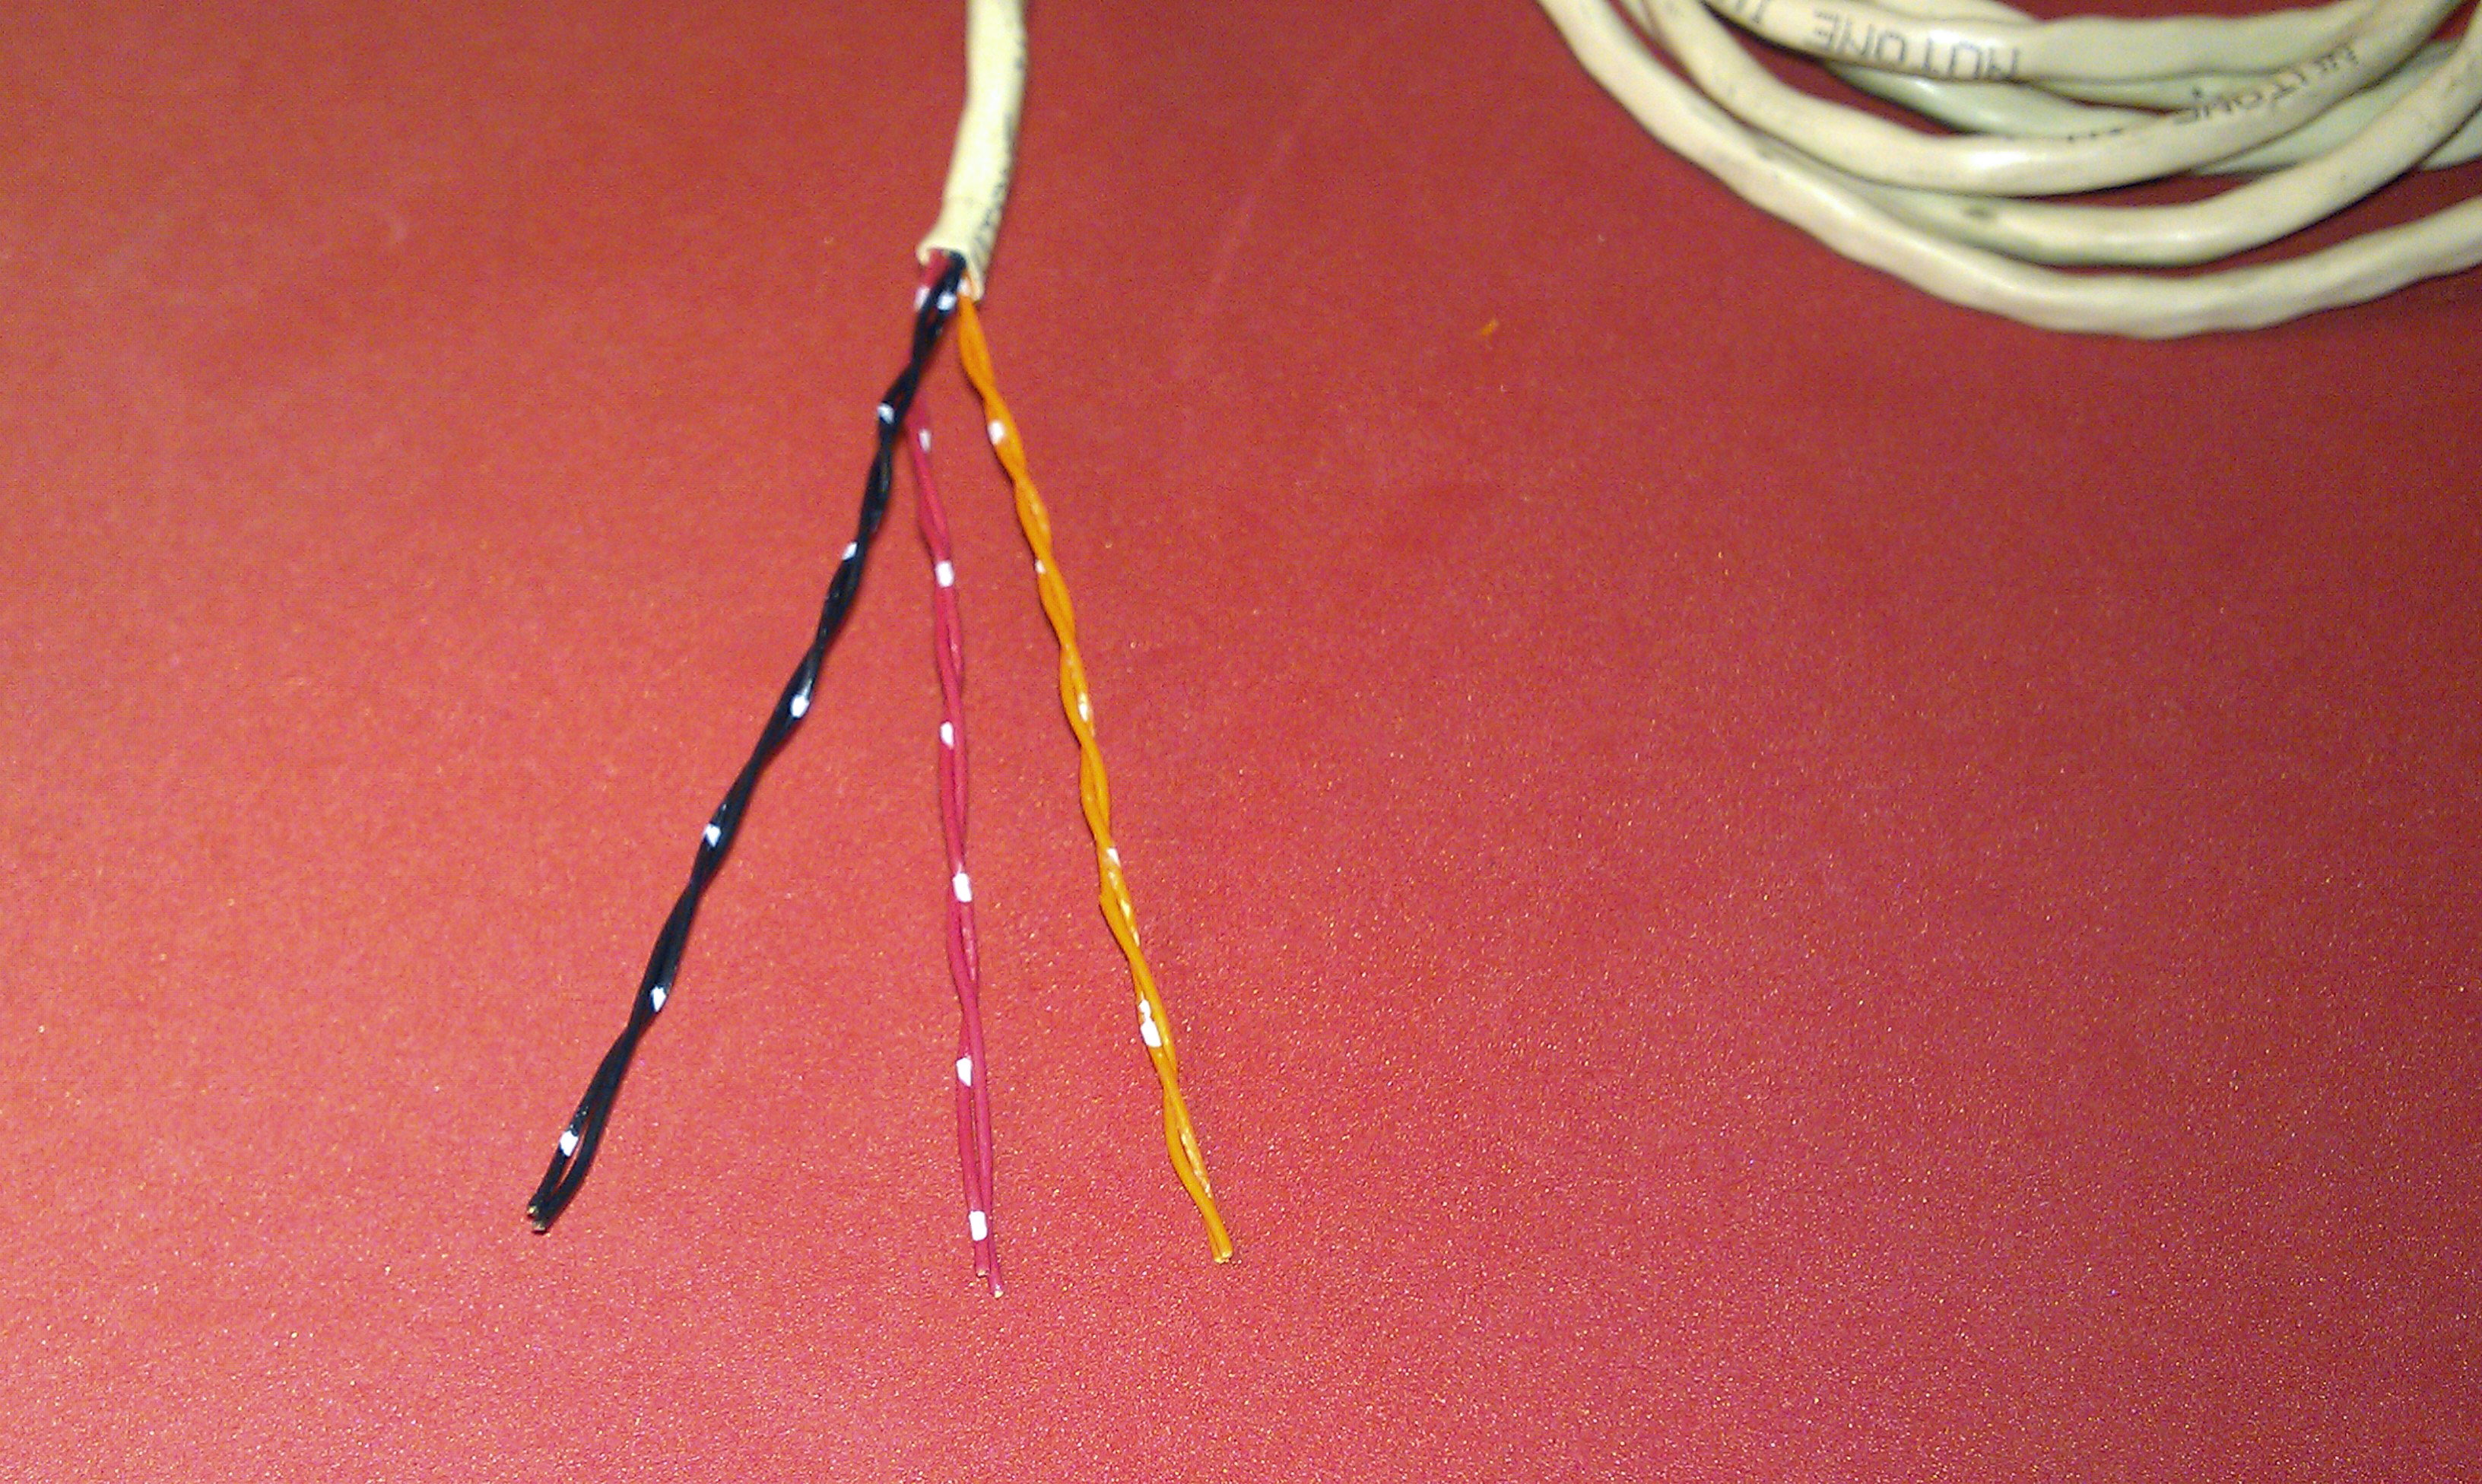
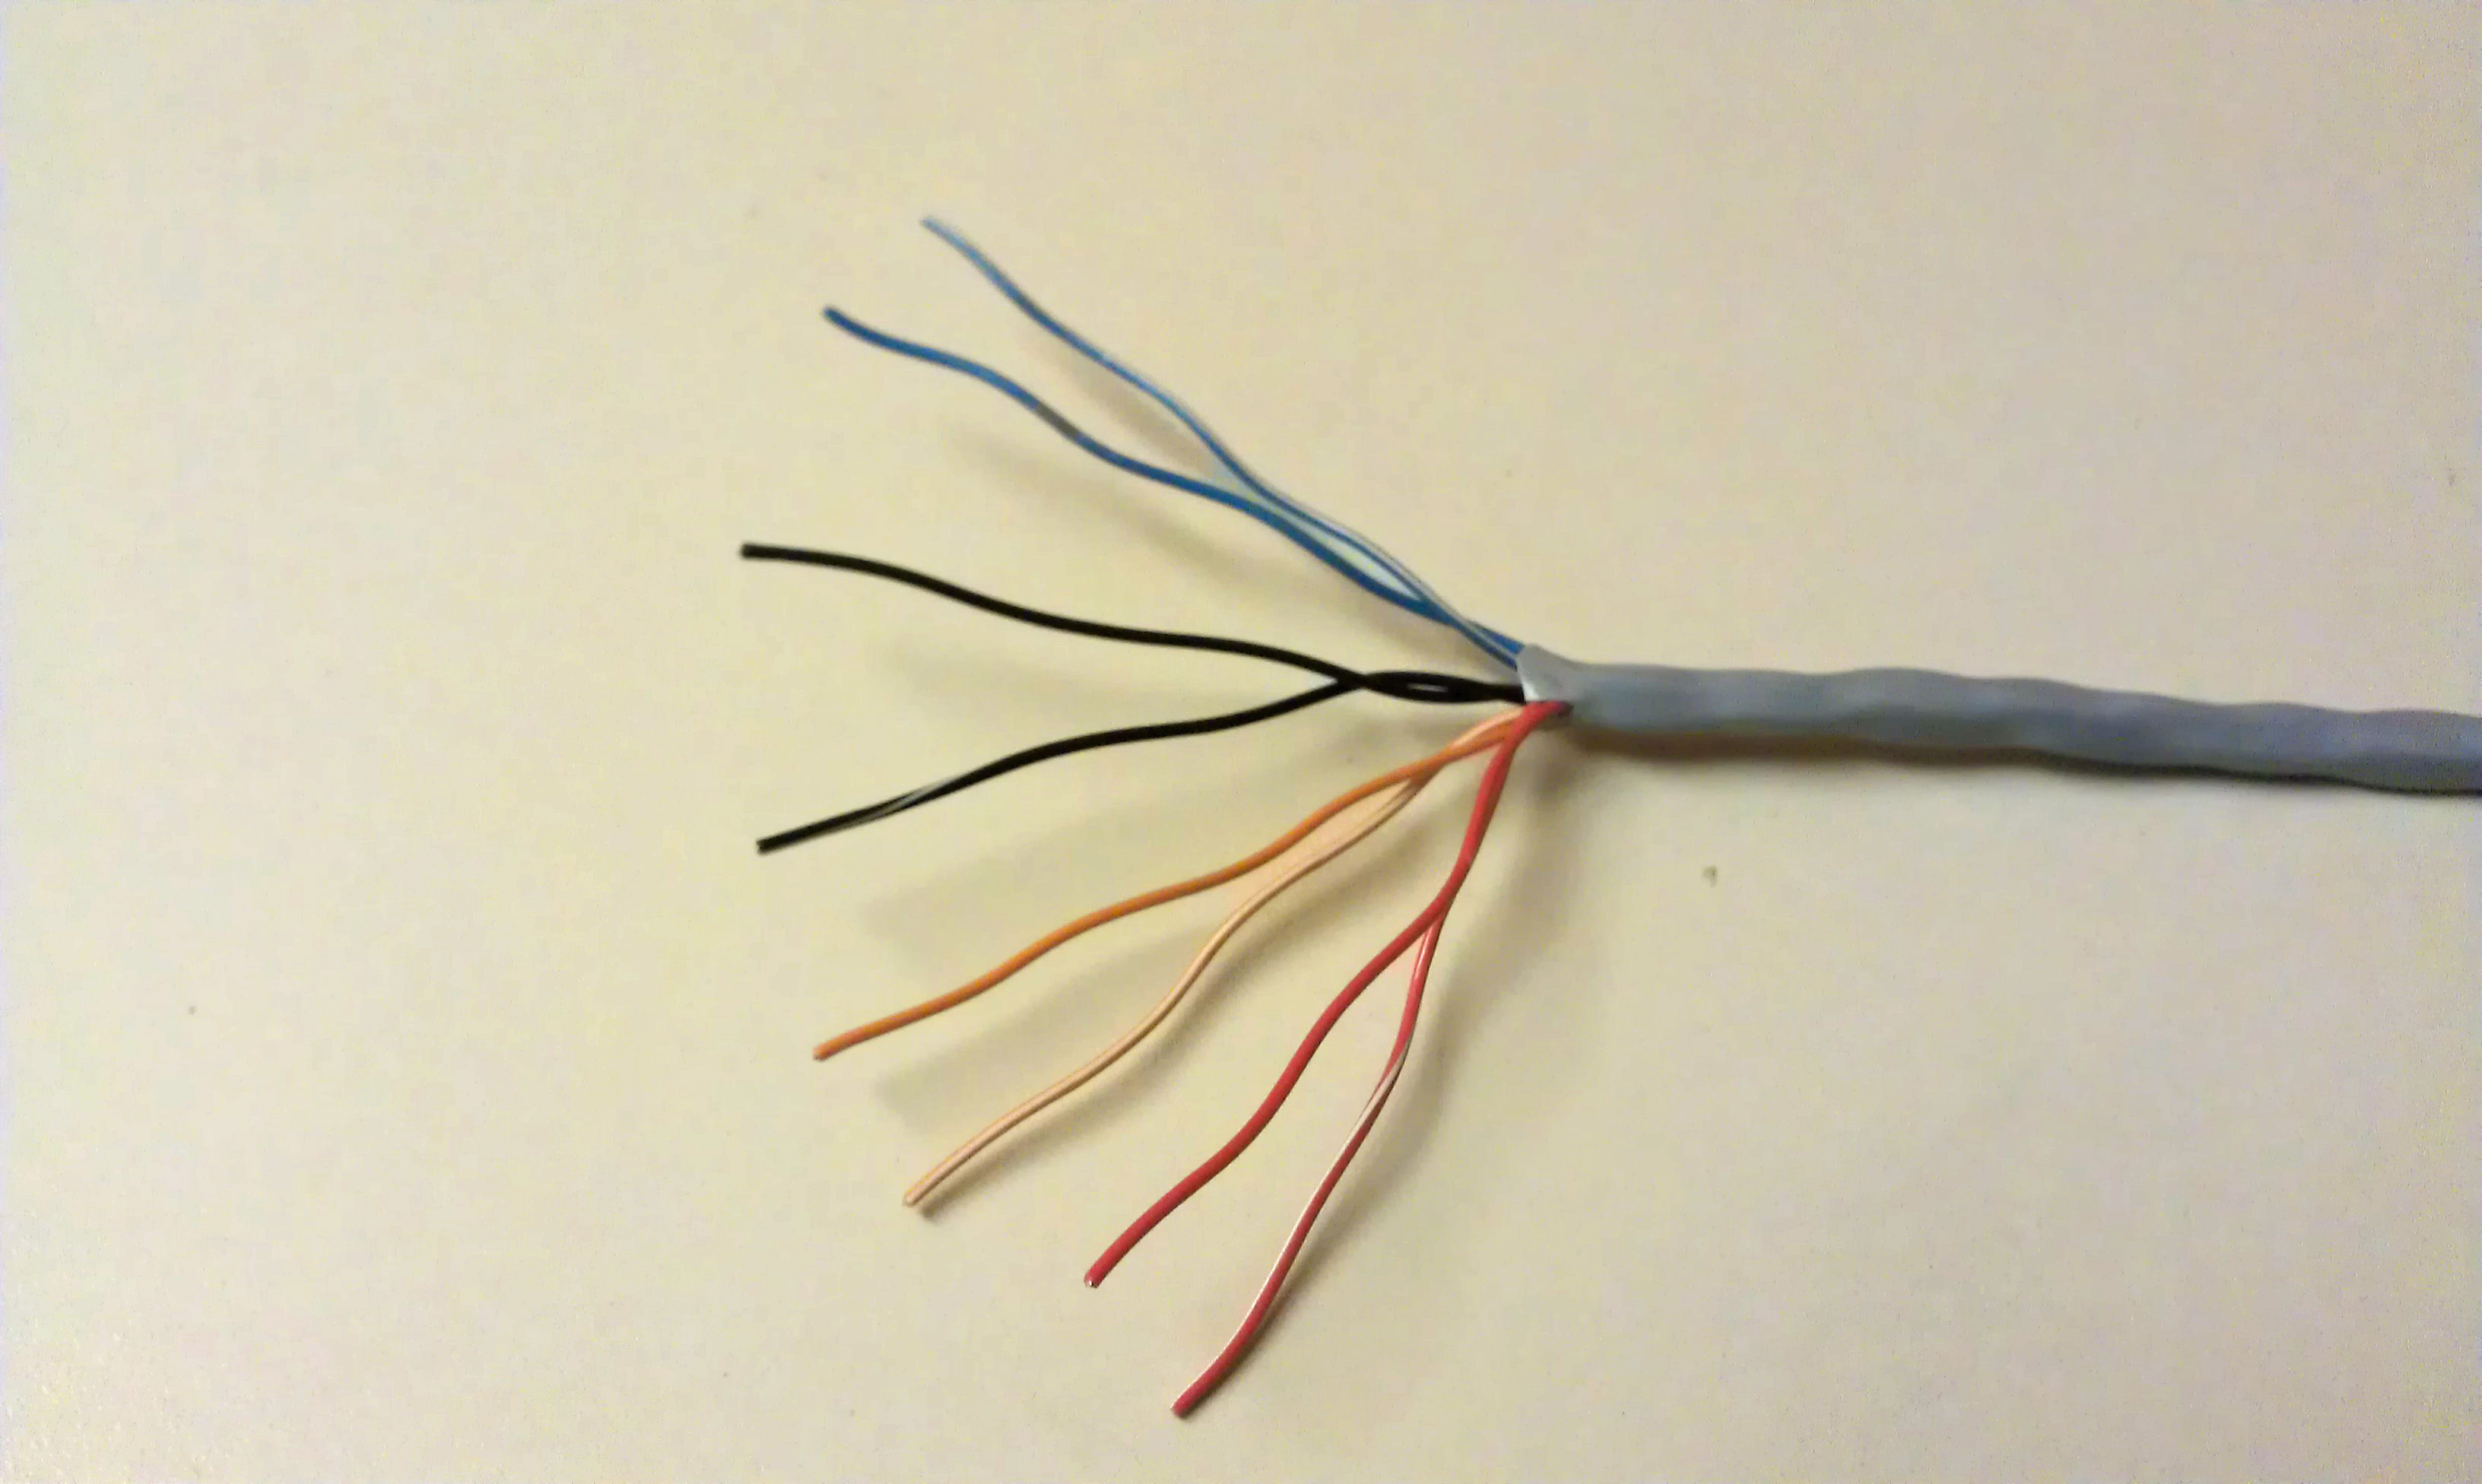
On 6 and 8-wire systems, you will have 3 or 4 twisted-pairs of wires. These twisted-pairs will be colored Red – Black – Orange – Blue (blue is only in 8-wire cable). If you look at the pairs carefully, you will see that in each pair, 1 wire will be a solid color and the other will have a white stripe. This is how the wire is indexed for proper polarity.
When you look at the connections on the back of a 6 or 8 wire speaker station, you will see that the screw terminals are labeled “Red/Red White”, “Black/Black White” and so forth.
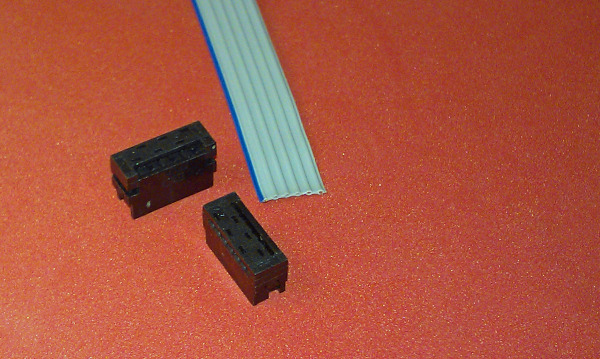
The exception to this is a special type of wire that NuTone used from 1986 through 1992. It is a special type of 6-wire cable designated IW6R. IW6R is a flat 6-conductor ribbon cable used on the original IM4006 system.
The idea behind this ribbon cable was the it used special crimp-on connectors which terminated the cable and plugged on to the matching connector on the speaker board.
This design was a great failure. The original IW6R ribbon wire had solid wire in the cable and it often failed to make a proper connection in the crimp-on connector. Later the wire in the cable was changed to stranded wire, which helped the termination problem to some degree but it did not solve the problem completely. The primary issue, after the wire design was resolved was that installer would not read the instructions on how to terminate the wire, and if it was done incorrectly, the connection would not hold up.
I must have completed hundreds and hundreds of warranty calls which just involved changing out all of the crimp-on connectors.
IW6R cable has a blue stripe on one edge, as an index to identify the wire strands inside the ribbon. Starting on the edge with the blue stripe the color order is: “Red/White”, “Red”, “Orange/White”, “Black/White”, “Black” and “Orange”.
It is important to keep this order consistent throughout any installation when you are reusing IW6R cable and installing new equipment.
Reader Comments (105)
Hello - Great Website and very helpful.
I have a system from 2001 with 7 inside speakers - The remote speakers are model ISA 445WH. There are 3 of them that cause a very scratchy noise when the talk button is depressed, exactly as you describe in your post. Therefore I'm planning to try to take the talk switches apart and clean them, however I don't see a way to try to get the switch disassembled - is there a trick to getting them apart without destroying them or ripping the PC Board traces off the board?
Thanks,
Rob
Hi Rob,
DO NOT TAKE THE SWITCHES APART!!!! You will never get them back together and have them work correctly. You can use some DeOxit D5 spray cleaner and spray it through the small space between the push button shaft and the body of the switch. You may need to perform this several time to get the desired results.
Thanks
Chris
In 1968, we installed a full 2541 system in a new construction home. I noticed in the history listing that the 2540/2541 is showing as having been around from 1972 to 1975. Your website has been the major source of information on the vintage systems.
Are there any other catalogs available that show when the 2540/2541 first appeared?
Thanks!
Hi Steve,
You are of course correct about the production date for the NuTone 2540/2541. These dates also hold true for the model 2090/2091. I have corrected the date in the timeline. I really appreciate the heads up about this.
Thanks
Chris
A question about retro fit; we had one of original models in 1956 era house that had master in kitchen with satellites in living room, den, 3 brooms and front outdoor. After the flood (Katrina) we refurbished inside and purchased a 3303 system and installed master in same place and satellites in same place with the original cable still in place dangling in the cut outs. This cable is nutone gray cable with 6 lv color wires and a pair B/W 22ga shielded wire in it. The master is powered up and works fine in kitchen, however, my understanding is that this existing cable is for the "loop" system and won't work with the 3303 homerun system which uses 3 wire cable to operate the satellite units. I want to at least use the outdoor speaker for intercom so I located the cable that comes from master into LRoom unit and then cable from there goes to outside unit; attached the B/W pair to the 2 screw slots in master board and connected the B/W pair in LRoom cutout which will connect through to outside and I attached to the outside speaker; this should work the intercom to outside shouldn't it? I havn't been able to test yet. Also, I connected 3 of the color wires to a 3 slot in the master and then to the board on satellite speaker, when I press indoor talk, or door talk the music will play only, but stop when let go. What are my options with this existing cable? I can not replace without major sheetrock removal. If I connect all the 22ga B/W wires to each speaker will this operate intercom in each?
Thanks,
Jack
Hi Jack,
Your installation questions are to complicated to answer in a post on the web site. There may be a way to salvage some of the original wiring and have some of the remote stations work. Please call me when you have a chance to discuss the ideas on how to do this
Thanks
Chris
I have a nutone 3003 system that works fine with the exception of the cracking noises due to dirt and dust you have previously discussed. I have not yet cleaned the push buttons or volume control knobs and was wondering if that could be causing my extremely low door chime volume? Any suggestions?
Hi Ken,
The issue with low Chime Module Volume can be caused by several different things. If you also have low Music Volume and Low Intercom Volume, then your IM3003 likely has a failing Power Supply and or Amplifier. You can determine by checking the setting on the IM3003 Master Station, if the Program Volume is set to full and the Master Speaker Volume is also set to full and you have very little volume on the Radio, Chime and Intercom, the IM3003 is the source of the problem.
It is also possible that the Chime Module is failing and has low signal output or that the Chime Input Circuit has a failure and even thought the Chime Module is working correctly, the signal is not getting through properly.
All of these issues can be repaired, please fill out an Intercom Repair Request Form, and once I receive it, I'll contact you directly about the problem
Thanks
Chris
Dear Chris,
I appreciate your site and all the advice you are able to give those of us who do not have a clue about these units! I have a NuTone IMA-3303/IM-23303, in a house I bought just over a year ago. It has been working fine until just a few days ago. Now I cannot hear anything -- the radio, the doorbell, or intercom messages. But I can see that the unit is on, and the clock is working (and correct). Can you advise me on what I might need to do? (The only thing I can think is that about a week ago, an alarm service guy came to install a new keypad in one of the rooms, very near the NuTone speaker in that room. We looked behind the speaker and did not see anything obvious like crossed or cut wires or the like. I don't know if he turned off the circuit breaker in order to install the new keypad.)
Thanks in advance for any help you can provide. (What city are you in, by the way?)
Best,
Ginny
Model N2561.
I am installing a second N2561 in order to send stereo to select rooms.
I have several questions:
1. what are the advantages/disatvantages of a centralized system vs a decentralized system?
2. 8 wire cable is probably NLA from Nutone, what type of cable should I use? Shielded/non sheilded, solid or stranded, AWG?
3. I have NOS 45 ohm door speakers, yet I'm afraid to use these rare gems with the paper cones...are 45ohm plastic cone 3 1/2" drivers available from a different source? Or can I use 16 OHM?
4. I have NOS poly planars for the patio, these say 16 ohms (replaces 45Ohms), Will I lose talkback ability from the outdoor patio station if I use these? Will these overload the Master since they are only 16 OHM?
5. Is it posible to use the NM series 8" 45 OHM
coax drivers in place of my full range drivers? will talkback work correctly?
6.How many speakers can I run off a N2561 master?
7. Can both input RCA's on the N2561 be used at the same time (or will it behave like a mixer)?
8. Is it possible to change the selector switch on the Master to include more positions, Input options?
Hi Michael,
You have asked some very specific questions, so I will answer them in the order you asked them.
First, I not sure exactly what your project consists of exactly, but having two N2561 Master Stations installed together will not result in stereo sound. You will only have dual-mono sound.
While many high end Home Audio Amplifiers are a Dual-Mono Block design you will need a Stereo Pre-Amp between the mono-block amplifiers and the music source to end up with true stereo sound. You will also have to deal with the Intercom Functions with your “stereo” N2561 system. On true NuTone Stereo Music Intercom systems, only the “A” channel is used for the intercom functions.
Now for your questions:
1. The advantages of a decentralized system is the ability to make adjustments on a room-by-room basis at that rooms speaker. The user does not have to go back to the Master Station to make these adjustments, they can be made at the remote station as soon as the user wants. It's a matter of convenience.
2. Since the original NuTone IW8 cable is no longer available and NOS cable is difficult to find, I would use the more common NuTone IW6 cable and run an additional pair of NuTone IW2 with each run. The will be close enough to the original IW8 that it won't cause any operational problems and both IW6 and IW2 are still easy to buy online.
3. There are no 3.5” 45 ohm door speaker cones available in either paper or plastic any more. If you have some original 45 ohm door speakers, I would use them. There's no point in saving them for the future, that future is now. There are paint on coatings available the will help protect the paper cones from the UV rays and water, this will help make the paper cones last longer.
4. 16 ohm Poly-Planer speakers are not original to the N2561 system and I would not use them. The lower impedance will place additional stress on the amplifier and they may cause an imbalance with the system when your using the Intercom. I use 45 ohm speaker cones from Music & Sound ceiling speakers, model NR8P. These fit exactly onto the original NuTone grills, since these are indoor speaker cones, they should be coated to protect them from the weather.
5. See #4
6. The early NuTone catalogs state that the N2561 can have “at least 16 stations” the later catalogs state “up to 16 stations, or more” so, I don’t know the exact maximum number.
7. Since the axillary inputs jacks are controlled by the Selector Switch, there is no way to have them both be connected at the same time.
8. Probably not. You would have to find an old school style switch with more positions that will fit into the chassis and have the correct control shaft dimensions. Setting up an external input control unit would be easier.
Thanks
Chris
Chris, thanks for you answers.
The project consists of running a separate N2561 in parallel with the original master (hybrid system). The stereo function will work for input source with the selector in phono position as the two units will essentially work as right and left channel mono amplifiers. The source signal will be split out to both units. FM and AM will be mono.
The second system will NOT be used for intercom function, only left channel sound amplification to 4 or 5 select zones. the rest of the system will be mono zones powered by the original system.
There are 21 possible zones if all bathrooms, garage and patio are utilized (which not all of them will).
The original system has 10 indoor stations(including master), one patio station, 3 door stations, electronic chime, 3 doorbells, and low voltage wall clock system. I wish to extend the system (mono) to the basement workshop, garage, and at least the master bathroom. as well as add second speaker(for stereo) to Master BR, Family room, basement Bar, and patio at minimum. All door communication will be handled by the original system.
The input selector switch on the master activates the RCA phono input on the bottom of the unit, there is also a second input on back of Master, When the switch is in the phono position are BOTH of these inputs activated at once? If so, it would be desirable to replace the selector switch
with a vintage one with an extra position, then wire it for two SEPARATE inputs. In simplified terms, I want one input for a combined (L&R) signal, and the other input for right (or Left) channel only signal, and I want it all to switchable from the Masters.
I would also like to know if the second system (left channel stations) could be operated on potentiometer only? This would save lots of expense as good working controls are hard to come by (I already have 5 or six) but want to know if "POT only" is a possibility.
The original system is loop wired. The parallel system probably will be as well.
Michael,
You must have an early N2561 if it has 2 phono input jacks. These jacks (M10 & M11) are both connected at the same time when the Selector Switch is placed in the Phono position. I am not sure how successful you will be at finding a replacement selector switch with the same form factor and additional positions.
There isn't any reason that you can't use just volume pots for the second channel. The original pots are 350 ohms. I'm not sure if they have a linear or audio taper to them, you should measure one to find out and choose similar new pots.
I don't know what your external music source will be, if it's a turntable you may need to address the grounding on the turntable. If the external source is a modern device like a MP3 player or CD you may need to run it trough an external DAC to achieve the best sound quality.
I'm still not clear on how your planning on creating "Stereo" from this equipment without using a Stereo Preamp.
If you would like to document this "Hack" with descriptions of your work and pictures, I'll post them on here for everyone to see, This seems like it will be an interesting project and I'm sure there will some interest in it.
Chris
Chris, I know stereo will work because I presently use the desktop computer as a preamp, I just take headphone out, use a stereo to mono combiner, then and adapter from mini-plug mono to RCA mono, and on in to the bottom input. the sound quality is fine and I can control volume from the desktop. I can even talk and listen to skype/ VOIP through the intercom, while away from the desktop microphone! Also, a preamp is not even necessary, an IPOD nano plugs directly in via a combiner, and also works fine.
On the OHM ratings, you say the poly speakers don't go with this system. But, as far as I'm aware Nutone never made any 16 OHM systems? The polys say right on them "to replace 45 OHM". Another 1970's 2561 system pull I picked up was using N-471 patio speakers, and these are 25 OHM. I believe there is even a representation of 2561's using 471's in the catalog. It would sure be nice to track down an install manual for the 2561/62 that was more clear on the real capacity of these units.
I won't be installing for a few months other than making some tests...I will keep you updated, and send pics if you'd like.
BTW I saw you're new "Hacks" area, further comments I will post over in that forum.
Cindy, Christopher.
Thanks for this helpful site. I have a old IMA 203 . Music and intercoms work great. There doesn't appear to be a door chime accessory or if there is it dosen't seem to work . Is one available for this model and if so what is involved in the installation? Thanks again
Don D
Hi Don,
The NuTone IMA203 uses a 3-Wire Door Speaker, which has a "Push-To-Talk" button on it. Also, if the Door Speaker switch on the Master Station is in the "ON" position, music will play through the door speaker (if the radio is on).
The original model numbers for the Door Speaker are ISA62 (Surface Mounted Speaker) or IS60 (Recessed Mounted Speaker, requires on IR6 Rough-in) These sow up on eBay quite often and usually are not to expensive.
To connect the door speaker to the IMA203 Master Station, you will need to run a NuTone IW3 3-conductor wire from the door speaker to the IMA203 Master Station
Thanks
Chirs
Thanks Chris
I do have a IS 60 type door speaker presently installed at the front door. I am trying to get the chime feature to work. The IS 60 only has one button (talk to speak) and it works fine to talk to other stations when pushing the talk to speak button, or hands free when talking to the IMA 203. I am wondering if I want the chime feature to work will I need to install some sort of chime module in the IMA 203 master and add another button and an additional a pair of wires to the front door, or should the system work as is, but there is a fault in the IS 60 or the IMA 203. Again thanks for being so patient with us novice do it your self types.
Don D
Hi Don,
Chime Modules did not yet exist when your IMA203 was manufactured (main-stream chime modules were introduced in 1984) The original way that a door chime would have been connected to a IMA203 (or other models up to the 1984) would be to have a special NuTone mechanical chime (Modlel LB76) which worked like a conventional 2-note chime (ding-dong) but it also had a pair of electronic pick-ups (like on an electric guitar) that would transmit the tone bar vibrations to the chime input of the IMA203. If the Intercom system was left ON, the chime tones would be heard throughout the system.
It was also possible to use a NuTone Electronic Musical Chime (model LA55, LB55, LA60 LB60) in place of the mechanical 2-note chime and have it connected in the same way as the LB76. This would work in the same way, just with a nicer chime sound.
In today's world you can still modify your IMA203 system to include a NuTone Electronic 8-Note Chime, model LA174. The model LA174 is based on the original LB55, however it only plays a 8-mote Westminster Chime.
The LA174 can replace your existing 2-note chime, however it must NOT BE POWER by the same transformer that powers the IMA203, IT MUST HAVE its own separate transformer, otherwise it will blow itself up on the first ring.
You can follow the installation instructions for the original LB55 Chime to see how the LA174 connects to your IMA203. These are available in the download section of this site.
Keep in mind that the IMA203 and the LA174 are two completely separate systems and will work independently of each other, except for the minor connection between the chime and the master station, that the chime sounds travel through.
Thanks
Chris
Hi Chris
Thanks for the great information and the time you spent putting it together. I will now see if I can make it all happen. Thanks again.
Don D
Morning Cindy and Christopher,
I have a IMA 4406 WH system that came in my home that I purchased 3 years ago. I have a intercom at the front door that doesn't seem to work and I have speaker wires hanging out the back patio. With a missing volume control switch on the patio door and missing speakers I've been very confused on what to get. I went and purchased some outdoor speakers from best buy and was looking to buy a volume control switch but I realize after I bought the speakers that they where 8ohms speakers and I figured this Nutone system can't supply those speakers needs and thought about running a seperate amp. Now I'm not sure what to do about the outdoor speakers or getting the front door intercom to work. Any advice would be greatly appreiciated.
Best
Madison
Hi Madison,
Lets look at your questions one at a time:
1. Front Door Entry Speakers typically stop working because the speaker cone behind the grill has failed. This is an easy fix, just replace the speaker cone with another genuine NuTone part (which we have). If you have a Ohm Meter you can check the original speaker cone first. Remove the 2 wires from the speaker terminals and measure across the terminals. It should read somewhere between 14.5 and 18 ohms.
2. When the IMA4406 was in productions, NuTone offered a selections of Surface Mounted Patio Speakers which were primarily designed for "Music Only" installations. The correct layout would be to have a single Surfaced Mounted Speaker which would be controlled by either a simple volume control or a Patio Remote Control (which gave the user Intercom Functions as well as music). It is not uncommon to find installations what have 2 Surface Mounted Patio Speakers connected to a single control (sort of faux stereo)
To rebuild your setup you will need some of the following:
IS903 BL or WH - 25 Ohm 2-way Patio Surface Mounted Speakers
IS9523 BL or WH - 25 Ohm 3-Way Patio Surface Mounted Speakers
IC901W Outdoor Volume Control
IC901 Indoor Volume Control
IC441WHW Patio Remote Control
Finally, you are correct about no using the speakers you purchased at Best Buy, the IMA4406 is not balanced for use with 8 ohm speakers.
You can contact me directly about the items you need to complete your system
Thanks
Chris
925-743-8236
Can you please help? I am re-entering my query here:
Dear Chris,
I appreciate your site and all the advice you are able to give those of us who do not have a clue about these units! I have a NuTone IMA-3303/IM-23303, in a house I bought just over a year ago. It has been working fine until just a few days ago. Now I cannot hear anything -- the radio, the doorbell, or intercom messages. But I can see that the unit is on, and the clock is working (and correct). Can you advise me on what I might need to do? (The only thing I can think is that about a week ago, an alarm service guy came to install a new keypad in one of the rooms, very near the NuTone speaker in that room. We looked behind the speaker and did not see anything obvious like crossed or cut wires or the like. I don't know if he turned off the circuit breaker in order to install the new keypad.)
Thanks in advance for any help you can provide. (What city are you in, by the way?)
Best,
Ginny
Hi Ginnny,
The problem that you describe with your IMA3303 is a general problem and there could be many things causing the problem.
If you fill out an Intercom Repair Request Form (under the navigation heading on right-hand column on ever page) once I receive it, I'll contact you to discuss the problems with your system.
You can also call me to discuss the problem
Thanks
Chris
925-743-8236
Hi Chris, We have a Nutone IM-4006 model intercom in black. Someone broke off the master volume slide button....Can I get that replaced...or use something else? Also, we are getting a loud buzz when using the actual intercom to talk....(we have inside speakers only)
Can you help me?